3/18/12

iPad OverDrive Tutorial

Libraries have changed in the digital age. Many new libraries are being designed with less shelf space for hard bound books and adding more space for computers & desks. Fewer books on the shelves may mean you won't be able to find a copy of your favorite thriller when you want to read it but the change to the digital world also has its advantages. One of the biggest for the voracious reader out there is digital books.


Holding a real cloth and paper book may be comforting for the old school among us but more and more publishers are discovering that they sell more digital copies than paper copies. Companies like Adobe, Amazon and Barnes & Noble recognized and spurred the change with  their own digital book formats. iPad, Kindle and Nook compatible books are now the mainstay of many libraries. To distribute those digital books, libraries rely on a company called OverDrive. OverDrive set up an infrastructure that lets library patrons check out electronic books, audio books and videos. Because using OverDrive isn't intuitively obvious I've written instructions to help guide you through the use of OverDrive to check out and read library books on your iPad. 


Set Up OverDrive


Make Sure Overdrive is loaded on your iPad. If it’s not you can download it at the in the App Store in iTunes. If you don’t have OverDrive installed you can download it here:


      Overdrive 


Another account you will need to have is an Adobe ID. This is required to read the EPUB version of e-books. To get an account go the adobe website and create your Adobe ID. 


You can use a unique, but not necessarily functional email address for this step. They will not email you to confirm your account. 


To install your Adobe ID open OverDrive and select the “Get Books+” icon in the upper right of the screen.


At the bottom of the next screen click the settings button.


Now you just need to click the Adobe Authorization button and input your newly created Adobe ID.


Once these steps are done you can now start downloading books.


Downloading your Books


Open the App by touching it and you will see a screen showing all your current books and a “Welcome to OverDrive” book included with the program. 


Now click on the “Get Books+” icon in the upper right corner of the screen and you will be asked to “Add a Library”. Click the plus sign to add your local library.


Type in your local Zip code ... 


And find your library...


After you select your library it will be added to the OverDrive list and you wont need to add it again. Selecting your library from the OverDrive list will now open the Safari browser with the OverDrive web page for that library. 


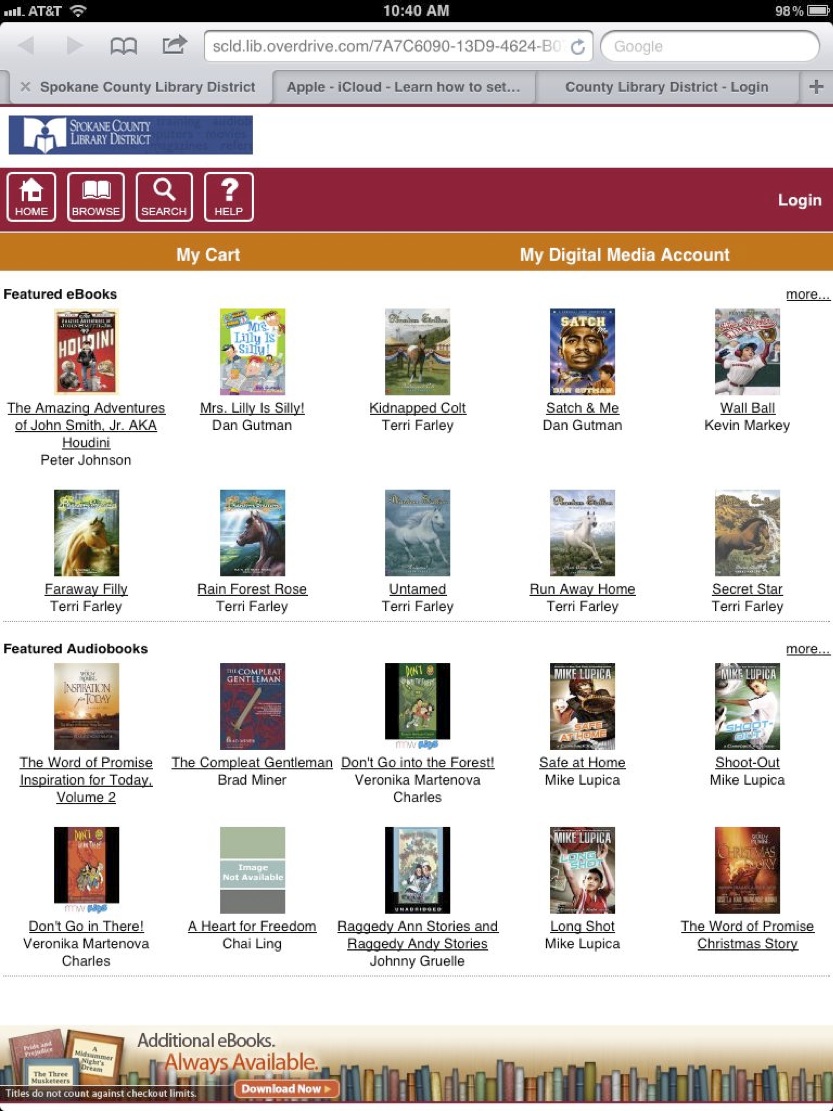
Select “Login” and enter your library card number and PIN number.  You may need to visit your local library to get this set up if you don’t already have a card and PIN number. 


Now comes the fun part, finding books to read!  Just click on the search tool (the magnifying glass in the tool bar) and enter your favorite author, title or subject. Once you find what you are look for you need to add it to your cart. For the iPad you need to make sure to select Adobe EPUB ebook.


After you add the book to your cart you can continue to browse the library or you can check out. Once you select the check out option a screen will be displayed showing you the books you are checking out, the format of the book (Adobe EPUB) and a choice for check out period. 


Unlike old school paper books libraries tend to limit the checkout time for e-books. They also limit the number of books you can have checked out at one time. If you are a fast reader make sure to choose the shorter checkout period because unlike paper books there isn’t a way to return e-books before they are  due. If you are at your book limit you may have to wait until the digital check-in period is over to check out a new book.


Once you have confirmed your check out you can download the book. Just click the download button for each book in your cart. 


Once the download finishes you can close Safari, go back to the Overdrive app and your books should be available to read!


Reading your Books


When using iPad Overdrive to download your library books you must use the Overdrive application to read your books.  This is a result of the digital rights management the publishing industry has instituted for all digital material. Each book has a digital signature with the library it came from and your library ID. When you check it out and download it the book is encrypted so only you can read it and only for the check out time period. It’s not convent but it works. Just tap on the book jacket to read it.


Settings


OverDrive does have some built in features to make reading easier. Like iBooks you can change the font size, screen background color & brightness  as well as set reading to night mode. Just tap once in the middle of the screen and the menu selections will appear. At the upper left corner of this screen is an arrow to get back to the main OverDrive screen showing your book library. 


Now sit down with a good cup of tea and enjoy your books!!

3/5/12

Rumors & Whispers of New Products

The Mac world and all things Apple, have always had rumor sites. You know the ones; Some China based manufacturer leaks the specs to the latest Apple gadget and the blog world goes nuts speculating about how much they believe it (or not). When the first iPhone came out the Internet was awash with speculation on the new iPod turned phone. Before the first iPad came out rumors swirled for months about how big it was going to be, the screen resolution, if it would have a built in camera, what was the processor, no detail was too small for speculation.  Many sites got it right but just as many were way off base. Well today I'm about to join the ranks of the rumor sites.


First let me make something very clear, I have no inside source. I live a stones throw from many of the Microsoft campuses. If you want MS rumors I may be able to dig something up, but Apple rumors, not so much. I'm not connected with any clandestine Apple mole that feeds me information. I'm just going to speculate on current rumors and what they could mean based on creative thinking and a gadget freaks day dreams.

The iPad 3 is coming out very soon and the current buzz seems to have identified some features based on solid fact. I do believe that it will be about the same size and shape as the iPad 2. I think it will have a better camera and a 4 core CPU. I think it will be 4G LTE and will be priced about the same as the current iPad 2. The iPad 3 rumors are cool and interesting but everyone is talking about the iPad 3. What I want to talk about are the rumors that are starting up about the iPad-mini or 7 inch iPad.

When the first iPad came out people from the media asked Steve Jobs if Apple was ever going to make a smaller version of the iPad. Something that could compete with the Kindle, Galaxy or other small tablets that were in the market. He famously responded with, and I paraphrase here, "Hell No!" Yet the rumors persisted.

There is a current rumor that Samsung of all people, has leaked that they are going to supply Apple with 7+ inch displays for new smaller iPad device to be released in the 4th quarter of 2012. Everyone is convinced that the world needs  a new smaller iPad to compete in the world market and it's going to be the next big (little?) thing from Apple. As for me I don't think so. Or rather, I think everyone has it wrong. I don't think it will be an iPad at all.

Heres my big prediction. I think Steve Jobs lied by omission. He was totally truthful that there would never be a 7 inch iPad but he was never asked if Apple was planning on making a remote for the rumored Apple TV.


You see, there are also a lot of rumors going around about a new Apple TV product that is a real TV with the Apple infrastructure for media distribution built in. Some say it will be a 50-inch set costing about twice as much as most TVs of the same size. Others think it will come in various sizes. But whatever its form, many people, myself included, are convinced that this is a real device. Sometime this year I think we will see an Apple product that will truly revolutionize the living room and home media in general. If you want to read about it you can do so here, here or here.

If you take as fact that Apple really is going to build this device then you have to ask yourself how are you going to control it? Then a light bulb appeared over my head ( no CFL for me, it was a good old fashioned incandescent). What if that rumor of a 7 inch iPad was in fact a controller for this new Apple TV set?

I was excited. I thought about it a while and figured that Apple would want to wow the market and make something spectacular that worked well if they were going to get people to invest some serious money on a TV set. A well designed TV with an integrated AppleTV interface would be great. But you would also need some way to control it. Something quintessentially Apple. Something easy to use and inspirational. Sure you could use an iPod, iPhone, or iPad but contrary to Apple's goals, not everyone has one. Maybe, just maybe, they plan on including a smaller iPad like device that can take user input, give feedback and act as a mobile interface to your TV.

If you built such a remote it would have to have features a standard iPad/iPhone/iPad doesn't have. Maybe it would have a  high quality microphone built into it. You can use it for inputs to Siri without getting Siri distracted by the sound coming from the TV itself. That same mic could also act as a way to balance your speakers for you so you have the perfect audio environment for listening to that movie Apple just sold you.

Maybe it could have a built in IR blaster with the ability to control all your current devices attached to your TV. Wouldn't it be nice to have a universal remote for your Amp, Stereo, Blu-Ray player, & CD player? It could be a better version the Harmony remote.

With a large 7+" screen you could have IMDB like information at your fingertips. Maybe Apples social medial failure Ping would finally be useful.  Wow!

With all of those features I would buy one! And that's the point. A TV is great, but with something like a large remote, that can control ALL your devices, give you internet access, provide you with voice commands and come with the TV,  I think Apple would have a real winner on their hands. Maybe they could update the current AppleTV product to use it as well but I'm thinking it will probably be exclusive to the new Apple TV set.

So there you go, write it in your notebook and date it. I don't know if I'm the first to predict this, but I sure haven't seen anyone else speculate that Apple is making a 7 inch Apple TV remote for their new TV. In 6 months to a year I'll probably end up with egg on my face. But who knows, maybe I'm right. What do you think?

PS - Since I used some logos from other sites I figure I should at least link to them.

Cult of Mac
MacRumors
9to5Mac
MacOSRumors

2/25/12

Weekend Update

When it comes to computers and software, you have to remember is that there is always change.  New hardware comes out on a regular basis. For Apple, some the new Mac hardware comes out in the spring. But not always. As for software, it depends on the vendor. Some software get updated almost weekly. But most major (non bug related) software updates occur every 6 to 12 months. 


Sometimes updating software can be annoying, like when your favorite software feature is discontented. Other times its a good thing, like when your old forgotten program is now improved and updated. Well last week a new version of VLC came out that included a lot of new features.


The new version is an awesome update that I highly recommend you get. However, the challenge comes when you try to use Handbrake to rip a DVD. The software update to VLC 2.0 breaks the ability to run Handbrake.


I explained how to rip a DVD in this post. If you re-read the post you will see that VLC is a required part of the equation when using Handbrake to rip a DVD. Because of the legal issues with DRM removal, Handbrake itself doesn't contain the required libraries. It uses VLC for that task.The issue is a that VLC version 2.0 is missing the required library. 


To fix the problem you need to download and install the missing library from VLC.  You have 2 choices, download just the libdvdcss.2.dylib file and move it to /usr/lib on your own or you can download an installer package which installs it for you. Either way, once the file is installed, Handbrake will work once again. 


As a general rule most software updates don't usually break things. But if they do, use your favorite search engine and see if someone else has the same problem and has found a fix. I know it's goes agains all the laws of geekdom but as a last resort you can actually read the manual this often included with the software. Sometimes you might find your answer there as well.


2/14/12

Downloading YouTube Files

The internet has a lot of fun sites out there and one way to waste a lot of time is to poke around on YouTube. You can spend hours following funny and interesting bunny trails of different videos. Sometimes though, you wish you could download it and take it with you. Well consider your wish granted.


There are manual ways to download YouTube files, but if you want to do things the easy way download an application called GetTube and let it do the heavy lifting. You can use this link for the direct download.

Once you have downloaded the application you just need to set up the download location in the preferences window.


Then open up the GetTube application window and find the YouTube file you want to download. GetTube has an in-app browser so no need to switch to Safari.


You will notice a very small download button in the lower right corner. Just click the button and a dialog box will pop up asking you the format you want to save the file as.


Do you want the video or just the audio?  Pick one and hit download. After a while your download will be done!


Just go to the download location you specified to find your file and you're done. Couldn't be easier. 

2/3/12

Lion Tip - Sorting items in Finder Windows

Whenever Apple, or any OS maker, puts out an update to their software there are inevitably changes that someone doesn't like. I remember when I moved from OS 6.5 to 7.0. Wow! Huge changes but there were things that really bugged me. When Apple went from OS9 to OSX it was a huge change. It was a fun new playground for my inner UNIX geek but again, there were items that got left behind that were kind of annoying.

The most recent update from Snow Leopard to OSX Lion 10.7 really didn't leave much behind at all. There were some minor tweaks and new functionality (Airdrop,etc.) and I loved everything. Yeah there was some software that stopped working (any PPC application) but that that was more planned obselesence. For me OSX Lion was something  I could live with. That is until I noticed something strange with Finder windows.

I usually choose to view my finder windows in list mode. That way I can click on the column headers to either sort by Name, Date Modified, Size or Kind. My problem was that some windows didn't allow me to do that. I hunted around in the Finder Preferences, System Preferences and even online for an answer. No luck. For better or worse some of my windows started looking like this:

Do you notice that the headers are a different font and color than normal? They are light grey and that is an Apple signal that something can't be selected. Click all you want, the list wouldn't let you click on "Name" and sort things alphabetically. 

I finally figured out what was going on when I noticed the "Arrange By" selection in the Finder "View" menu" at the top of the screen. At first I tried selecting arrange by name or by kind, then I noticed the "none" selection at the bottom. I picked it and ... Voila!!! Now I can sort again.


Like a toddler that suddenly discovers what a potty is for I was really proud of myself. I was looking around for someone to pat me on the back when I noticed the selection of icons at the top of every finder window. On the left side of the list of icons there is a new "Arrange By" icon.  Never noticed that before. I picked that and saw the same list of sorting options. Boom!  Another slick new way to get something done. 


After all that hunting around I now have my windows the way I want them: list view and sorted by whichever column I want to select.


Ahhh, I feel so much better now. Sure it's a little OCD but customizing your computer the way you wanted really helps your workflow. And besides, it makes me happy.

12/26/11

Creating An Audio Book - A Better Way

As soon as the iPod came out people have worked to get their old audiobooks onto their new digital devices.  My family got one of the 1st gen iPods and I used a huge kluge setup to get an audio recording of Alice in Wonderland off a 33 rpm LP and onto the iPod. When you have an audiobook on CD and want to create a digital copy for your iPod, iPad or iPhone, it's easy (but time consuming and tedious) to create manually.

Today there are a collection of scripts and applications that make creating an audiobook a breeze. My favorite for the task is an application called Audiobook Builder.

You can try Audiobook Builder (ABB) for free by downloading it from the Splasm web site but if you want to buy it, I recommend you save yourself $4 and buy it from the Mac Store

Building an audiobook with ABB is easy. Just launch the application and select "Create a New Project".  On the panel that pops up, enter in the name and author of the book and drag in a JPEG of the cover art. 

If you want to add more detail just click the "more" button and go wild.


Once the preliminaries are out of the way it's time to start ripping the CDs. On the main screen select "Chapters." You can see that there are several ways to add files. You can use the buttons at the top. Drag files to the drop zone or import from CD. I'm going to assume that you want to build an audiobook from CDs.
Just insert your first CD and select import as a single file.  You can play with the quality of the recording but the "normal" setting works fine and the file size isn't too large. For really long books that don't contain any music or other sound effects you could lower the quality. Conversely if you want to bring out the high's and low's of narrators voice you can bump the quality up. 

After the first disk is done you will be presented a screen asking for the next CD. Just keep feeding the disks until you are done. One of the cool features of Audiobook Builder is the ability to stop importing, quit the application and resume the build later. All your data is saved in an intermediary Audiobook Builder file. You don't create your iTunes Audiobook until you select the "finish" button after all your disks have been imported. 


When you are done importing all your disks your screen may look something like this:

Since we have created one file per CD, Audiobook Builder uses the CD name for each chapter. That makes importing easier but the iTunes CD database may contain different names for each CD. Just remember that the names of the chapters will show up in your iTunes Audiobook as the file name. 


Kind of ugly isn't it? The order of the books is correct and it will play just fine but I think it's ugly and annoying.  Maybe it's my OCD nature, but  I think it's better to rename the chapters so it's a bit more organized. Before you build your audiobook clean up the name of each chapter so it is easy to tell the order of the book. Just double click each chapter and rename it. I like to use the name of the book and "1 of 15" and increment up to "15 of 15." Nice and tidy.

Now that things are cleaned up it's time to build the audiobook. Select the "Finish" button and the "Build Options" button in the upper right under the artwork. 

At this point you can change the audio quality if you want to. If you're happy with your original setting just use the "Pass through" check box. The M4B setting allows you the ability to bookmark your audio files. Unlike music you want to be able to start where you left off so make sure you select M4B. You can also size the chapter to any length you want but because we went to all that trouble of creating one CD per chapter just use the per chapter part style setting. Once you have all your settings the way you want them click OK and then build your audiobook. 

That's it! When the build is complete Audiobook Builder will automatically add the files to iTunes and store the output files to the destination you selected.  

I'm a miser at heart but for $6 you can have a full featured way to build your audiobooks that makes life a lot easier. I highly recommend it.

12/22/11

Creating An Audio Book

If you spend a lot of time in your car one of the ways to pass the time is to listen to an audiobook. If you have an iPod, iPhone or iPad you know that you can download audiobooks from an online store like the iTunes store or Audible.  But if you have the Audiobook CD's you can also rip them and create your own audiobook. The challenge with ripping an audiobook CD is getting the set up correct so your file size isn't huge and your books don't get mixed up with your music.

To manually rip a set of audiobook CD's you first need to change your import settings. Open iTunes and go to the "Preferences" menu.

Click the "Import Settings" button and change the settings to a bit rate of 32 kbps. Make sure the checkboxes are checked for variable bit rate encoding and Optimize For Voice. The Optimize For Voice limits the frequency to the range of the human voice.

If your audiobook contains music as well as voice you may want to increase the bit rate to 64 or 128 kbps. 

For each disk you insert you will want to select all the tracks and make sure the Album and Artist information is correct. Set the genre to Audiobook and make sure that the disk number is included.  You will want to make sure that you have the disk number because you will want to keep your files in order. 

One of the things that's different about ripping audiobooks rather than ripping music is how your rip the tracks. With Audiobooks you will want to rip the whole CD as one track rather than ripping them individually as you would do with music. Otherwise you end up with hundreds of tracks for a full book. I always create one track per CD. To do that you will need to join the audio tracks as you rip. 

After you insert each disk and edited the Album and Artist info to your liking, select all the tracks on the disk and go to the "Advanced" menu and select "Join CD Tracks"


A bar will show up around all the selected tracks and only a single check box will be available. Now just click the "Import CD" button and iTunes will rip all the tracks and combine them to one file. 

Repeat this step will all the CDs of the Audiobook until you have as many files as you have CDs. 

Once you are done ripping you now need to make sure that your tag info is correct. To make things easier I've developed a personal system where I change the name of the track to the title of the book, then add 1of 15 or 2 of 15 depending on which track it is. I also make sure that the track number is correct and change the "Composer" information to whomever is the reader of the book.  Make sure that all the tracks have the same Album name or iTunes won't group them together.

You now only have one step left. You may notice that even though you selected the genre as Audiobook the files still show up in the "Music" menu. That can be a real pain if you have set iTunes in shuffle mode and suddenly someone starts reading a book to you. To get your book to show up in the iTunes book menu you need to change the file type.  Apple distinguishes music from audio books with a file extension. The music file extension is .m4a, the audiobook file extension is .m4b.

Select one of the tracks and go to the File menu and select Show in Finder. Open the folder of audio files and for each track just edit the filename and change the extension from .m4a to .m4b. You will get a dialog box asking you if you're sure just click the "Use .m4b" button. 

Now in iTunes delete the existing files and drag the new .m4b files back into iTunes. Your book should now show up in your iTunes Books menu and are ready to play!

I'm just letting you know that this is the hard way to do things. There are actually a  lot of applications and Applescripts that can simplify the job. In my next post I'll review my favorite app for creating Audiobook files. 


12/7/11

Add Chapters to Video Files

In my family, exercise is a way of life. But rather than workout at a gym we workout at home using workout DVDs. Since DVDs are so cumbersome to deal with I usually rip the DVD and use AppleTV to stream the workout to our TV. It's much easier to pick the workout you want and you don't have to paw through dozens of DVDs trying to find the right one. 


The challenge here is that most workouts you buy don't have chapters. That sounds like no big deal until you have a workout manic like my daughter who likes to repeat parts of a workout to make sure she breaks a sweat. So this post is dedicated to her so she can add her own chapter markers and really get a good sweat going.


People other than the workout obsessed may need to add chapters as well.  Adding chapters to a home movie makes it easier to find the section you want to show. Adding chapters to TV shows you record can make playback more enjoyable. Whatever your need, adding chapters to videos is easy to do. The first thing you need is a video file. 


If you need to rip a DVD, Handbrake is the easiest to use. You can read about how to do it here or here. After you have a file, the easiest way to add chapters is to use a free application called Subler.


Subler is a Mac OS X application that opens video files, allows you to add or remove media tracks inside them, and then saves them out again. In the specialized language of the video world, Subler is a "transcoder" or "muxer." It's an application dedicated to creating MPEG4 files (.m4v, .mp4) for Apple's  iDevices.

Subler's original purpose was to allow you to easily add subtitles to your video files, and thus the name "subler". In time, new features were added to help Subler solve similar common problems. For instance, with Subler you can open an existing media file, add chapter titles, remove an unwanted commentary track, tag the file with season and episode information, and then save it back out again.

The main features are:

  1. Remux video, audio, chapters, subtitles and closed captions tracks from mov, mp4 and mkv.
  2. Add a subtitle track. Add tx3g subtitles tracks, compatible with all Apple's devices (iPod, AppleTV, iPhone, QuickTime).
  3. Add multiple soundtracks
  4. Add and edit iTunes metadata and TMDb and TVDB support
  5. Add and edit chapters

You can download it here:


Today I'm only going to cover how to add chapters to a .mp4, .m4v or other video file. Download and start Subler and then open the video file you want to edit. You should see a screen that looks like the one below giving you the basic information of your file. 

To add chapters you can do it a couple ways. If you want uniform chapter markers go to the "Edit" menu and use the pull down menu. You can add chapters every 1 min through every 30 min. 


You can also add chapters manually. This is probably the better choice because you can add a chapter at a natural break point in the video. To add chapters manually select the "Chapter Track" line, click the box to make sure it's selected and use the "+" at the bottom of the window to insert a track. You can now edit the time and the name to the values you want.

When you are done you just save the file. I recommend saving under a new name just in case you need to re-edit the file. Once you save you are done! If you open the file in iTunes or play it in Quicktime you will see that there are chapter markers. 


If you want to burn a DVD of the file you can use Apple Burn or Roxio Toast and it will retain the chapters. 


12/3/11

Tivo & the Mac - Edit your Tivo files

I have had an ElGato EyeTV unit for quite a few years now and it's been great for recording over the air TV on my Mac. One of the great features of this unit is the ease of editing recorded shows. With very little effort you can edit out all the commercials and just watch a show without any breaks.  Now that I have a Tivo I sure didn't want to start watching commercials again so I started hunting for a great video editing program that's easy to use that can edit the Tivo files. Although EyeTV is still the gold standard I think I found a usable work around with MPEG Streamclip


I've already covered how to download your Tivo recorded shows to your mac here. Now that you have the show you need to get rid of the commercials. First, download the MPEG Streamclip application. When you open the application you will get a screen that looks like this:


To edit a file just drag it to the screen or use the "Open Files" selection in the "File" menu. There are two basic editing functions you are going to use; trim and cut. First you need to select the sections of the show you want to edit out. 

Drag the slider to the beginning of the show and type "I" for "Select In" then just hit command+T to trim out that section. Trimming a file will cut out everything you haven't selected.


Now move the cursor to the start of the first commercial break and hit the "I" key again. Move the cursor to the end of the commercial break and hit the "O" key for "Select Out." Just the commercials will be selected (as shown in the screen shot below). Then all you need to do is use the cut command (command+X) to get rid of the commercials. If you have trouble finding the right spot when you use the select in or select out location use the arrow keys on your keyboard. They will allow you to move a frame at a time to fine tune your selection location.


Just repeat  this for all the commercials in the show. When you get to the end of the show type the "O" key and do a Trim again to get rid of the ending credits and trailing commercials. That's it! 

Now a few comments about the whole process; One of the challenges I had with editing video was making sure that the audio was syncing. At times, after editing, the audio would get out of sync and there would be a split second delay when an actors mouth would move and the sound would come out. It's very annoying and can render the file unwatchable. 

To make sure that things stay sync'd up here's some of hints that should help.
  • Try to minimize edits. Only use one edit per commercial break and don't do a lot of little edits. 
  • Don't use the export function to save your video. Just do a "Save As." When you save it will save to the exact same format you used when you moved it from your Tivo to your Mac. Sometimes exporting to a different format will get the audio out of sync.
  • Do a "Fix Timecode Breaks" (command+F in the Edit menu) when you first open the file. This may help.


From what I have read, the unsynchronized audio may be a result of a frame rate issue from the original video program. If you have issues with synchronization maybe try setting the frame rate to a different value when you move the file from your Tivo to your Mac. 

Good luck and enjoy your shows!