9/20/18

Should You Upgrade to a new iPhone?


A lot of people are asking if they should upgrade to the new iPhone XS, XS Max or XR. There's a ton of articles out there on camera performance, A12 Bionic chip, new waterproof standard, etc. What's not discussed is how it works as..., well, a phone. 

The biggest beef I have with my iPhone 6s, besides battery life, is the reception. My cell reception is horrible in many of the areas I frequent. I didn’t pre-order a phone because
 I want to make sure there’s a real difference in antenna design. 

I've done some digging and I thought you might be interested in what I found out. Since I’m going to stick with T-Mobile as my provider I will concentrate on those highlights but ATT & Verizon have similar impacts.
  • All of the new iPhone models support 27 LTE bands including the new T-Mobile 600MHz LTE band! That means the new phones can access T-Mobile network on more bands. More bands leads to better reception when T-Mobile upgrades their cell towers. 
  • The iPhone Xs and Xs Max & Xr have Multiple in Multiple Out (MIMO) LTE band connection abilities. But only the Xs and Xs Max have 4x4 MIMO. That means they support four antennas at the transmit end and four antennas at the receive end.  The Xr only supports 2x2 MIMO. With 4x4 MIMO you can potentially quadruple speeds if you have good cell reception or (like me) in areas of poor reception it will use all 4 antennas ganged together to make for a stronger signal. 
  • In addition to MIMO the phones also have gigabit LTE antennas that use part of the unused WiFi spectrum (where available). This means over short distances (because WiFi reception is limited in distance) you can get VERY fast connections up to gigabit speeds. T-Mobile and others are building out this ability in high congestion areas like sports stadiums, downtown areas, and shopping malls.
  • All the new phones sold in the US are universal. There is NO difference between a T-mobile version, ATT version or Verizon version. However, if you buy through your provider it will be locked to that provider so buy an unlocked phone or buy it from Apple. All phones purchased through Apple are unlocked.
  • You can have two SIMS active on two different networks. If you travel or (crosses fingers) if your work allows, you might be able to have 2 phone numbers and one phone. This will use one physical SIM and the e-SIM. However the e-SIM won’t be enabled until later this year. 
So, it looks like I’ll upgrade. I’m not sure when or which phone yet but for me it will be either the Xs or the Xr. I’m going to wait for a few of the Xr reviews before I upgrade.

3/22/18

Cord Cutting - Hardware on Sale

The past few posts I've been writing about cutting the cord, what hardware and software to use. Today I want to let you know that today Best Buy has SiliconDust Tuners on sale.


If you're in the market for a TV Tuner for your Mac now's a great time to buy! I'm not sure how long the sale is on so you better hurry.


SiliconDust HDHomeRun - CONNECT DUO - $100

SiliconDust HDHomeRun - CONNECT QUATRO - $130 

SiliconDust HDHomeRun - PRIME Tuner with CableCARD - $110


PSA - I'm not affiliated nor compensated by Best Buy or anyone else*

* Not that I'm not adverse to it but no one has offered so far. ;-) But either way I'd let you know.


3/19/18

Cutting the Cord - 64-bit Hardware & Apps

In my last blog post I wrote about the coming updates to MacOS that requires all applications to be 64-bit compliant. After searching through my Go-To applications I discovered that my current cord-cutting applications will fail when 64-bit is implemented. Bummer! Adding insult to injury my always reliable SiliconDust HDhomerun CONNECT recently died. The question before me was: What hardware do I buy and will the software work with the next MacOS? 


History

I have posted before about my desire to shed my dependence on Comcast and reduce my cable bill. Long ago I purchased an Elgato EyeTV tuner. It was a firewire tuner that worked great with my G4 MacPro. When it stopped working I moved on to SiliconDust but continued to use Elgato EyeTV software.

Unfortunately Elgato has moved on and they no longer sell TV tuners or software. They are now focused on their Eve Home IOT hub. Even the Turbo.264 Software I used to edit my MPEG files is no longer sold in the App Store. 


"Thank you for contacting Elgato Systems. Unfortunately, Elgato no longer provides support for the Turbo.264 HD QuickTime component nor for 3rd party API access to Turbo.264 HD hardware encoding, for both business reasons and technical limitations."

Both Elgato Hardware and Software tools have been sold off to Geniatech. And it seems Geniatech is more focused on the European market than the US market.  OK then, what now? I needed to replace both hardware and software and make sure it was 64-bit and fit my workflow.


The Hardware

One of the reasons that I bought my first SiliconDust tuner was that it was network connected and I could access the 2 tuners from any Mac on my network. In looking at the Geniatech products and other TV tuners available most had USB connections. One box and accessing that from any Mac on the network is feature now rely on so I figured my best option was to stick with SiliconDust. 

Since I wanted an Ethernet tuner not USB and only wanted/needed 2 tuners it came down to the old HDhomerun Connect model the newer HDhomerun Duo or the HDhomerun Extended.  

The HomeRun Extended has the ability to transcode video to H.264 on the fly so you can stream your content.  I don't really need that and since it's more expensive my choice came down to the CONNECT or the Duo.

The CONNECT model is and older hardware & cheap. It's often available for sale and Amazon and other online sites normally have it for under $70. There doesn't seem to be a real functional difference between the CONNECT and Duo models. Even the Silicon Dust web site seems to indicate they are almost the same. So why pay for a new one?


Glad you asked. 

*** IMPORTANT***

This took me a quite a few emails but here's the key difference between the CONNECT and the DUO. The old CONNECT model, when using SiliconDust HDhomerun software, is unable to do a channel scan!! The only way to scan for channels is to use a Windows computer.


"A channel scan must be run in Windows when using old HDHomeRun devices with the app. The old devices do not have the ability to run a channel scan locally nor the ability to store a channel lineup, so the Windows program must be used. Newer HDHomeRun devices have additional capabilities and can run the scan themselves, so Windows is not needed for them. If you do not have access to a Windows PC then we would suggest going back to an earlier version of EyeTV that does support the HDHomeRun.
- Silicondust Support"

OK SiliconDust HDHomerun Duo it is. 


Software

Now that I had my hardware I needed 64-bit TV tuner software that worked. As previously mentioned I used EyeTV as my tuner software for a long time and it is now supported by Geniatech. Unfortunately Geniatech Support tells me that all HDHomeRun product are no longer supported on EyeTV.


"We just discontinue (sic) support of the HDHomeRun products permanently.You can consider the eyetv u 6 but we can not make sure if it can meet all of your requirements completely. Plese check this link: https://www.geniatech.us/eyetv/  
Geniatech EyeTV Support Team"

If you do rely on EyeTV please be aware that version 3.6.9 (7520) still works with High Sierra & SiliconDust hardware. So don't upgrade! If you do upgraded you will find your EyeTV is bricked. It doesn't recognize any SiliconDust hardware. 

The good news is that you can downgrade the software and get it working again. Here's the link to version 3.6.9 (7520) download site if you want to grab it. 

SiliconDust does have tuner software that works with the Mac. It's a bit different than EyeTV but it works. If you have the newer Duo version of hardware you can use Mac and follow the online instructions to scan the airwaves for channels in your area and watch live TV. Basically you use a web interface (http://my.hdhomerun.com) that scans the local network for your HDHomeRun Tuner. 


Click on the "Channels" link in the white box to the left and it will take you to a configuration page based on the IP address of the tuner on your network. This site allows you to upgrade Firmware, and scan for channels. In large urban areas it's not a bad idea to rescan every few months as new channels are added frequently.


Once you have run the scan restart the HDHomerun application and you can now watch live TV.


Of course it's never that easy. The downside of the free HDHomerun software is that there is no DVR functionality built in. To get the ability to record your shows you will need to pay $8/mo. Wow! 


Conclusion

So in the end I bought a SiliconDust Homerun Duo network tuner and will use the SiliconDust TV software when Apple requires 64-bit applications. But now I need hunt down the best 64-bit compatiable DVR software for my Mac so I can record the programs I want. 

I'll get into that next time.


3/17/18

MacOS 64-bit only - What it means to you

At WWDC 2017 Apple announced that starting January of this year (2018) MacOS will be moving to 64-bit only applications. If you would like to know more about the difference between 32-bit and 64-bit you can read about it hereThis move by Apple means that High Sierra will be the last OS supporting 32-bit applications. 


When 10.13.4 is released some time this summer a user will be alerted when launching a 32-bit app letting them know it will need to be updated to 64-bit to work on future MacOS releases. This shouldn't come as a surprise since iOS did the same thing with iOS 11 last year.  So how does that impact you? In a nutshell, if you have 32-bit applications you still use they will stop working when Apple moves to it's next major OS.  

You may (or may not) be surprised at how many 32-bit applications you still have especially if you are a long time Mac user like me. My collection of old, outdated apps is rather large. That can happen if you are a digital pack-rat after finding something that works, stick with it.


To find the list of 32-bit only apps on your Mac do a self check: Open the "About This Mac" Under the Apple menu and select "System Report" 


Scroll down to "Software" And select "Applications" Depending on home many you it may take a while to generate a list. The column on the right tells you if you have a 64-bit application or not.


In the graphic above do you notice that EyeTV is part of this list? That's my current go-to application for recording over the air TV. So now what will I use to record ATSC (Advanced Television Systems Committeebroadcasts?  I'll cover some of the implications of moving to 64-bit in future posts.

Do you have any "got-to-have" applications that are 32-bit? Better start looking for updates or replacements.

2018 - Back in Action


Health issues and just simple blog-fatigue has kept me off Mac IT Help for almost a year.  I think it's time I started the Blog back up again.


I have a lot of thoughts I think need to be said so look for some updates soon. Starting with Apple's decision to move to 64-bit only MacOS apps. You may not think this will impact you but it will. I know it will change my workflow a lot and I'm not sure I like it.

Look for new content coming soon!


5/15/17

iTunes Stealthy Changes - A Fix!

Run, don't walk, and update to the iTunes version 12.6.1.25. As of 5/15/2017 it's available from the Apple App Store. 


It seems someone at Apple might actually read my blog. Well, Ok, maybe not, but at least they found the error I wrote about last month and actually fixed the mini-player issue! Wow. Kind of nice. 

Now if Apple would take a long hard look at and update iTunes and actually separate and streamline the whole media mess my faith in all things Apple would be restored. 

3/31/17

iTunes Stealthy Changes

In the past, I have blogged about how to create and add Ringtones to iTunes. I've also written up a post about How to tag iTunes movies and TV shows. I like iTunes. It has a purpose and, at least in the past, it worked well for me.

Recently things have started to change. I've expressed my frustration with iTunes updates that messed with the behavior of the mini player and I've ranted about general iTunes annoyances.  

This past week Apple released MacOS 10.12.4 and updated iTunes to 12.6. In doing so Apple once again messed with the look of iTunes as well as the behavior. Please Apple, STOP IT! iTunes was great once and now it's just a jumbled mess that's fading away.


Today I want to talk about some of the issues and problems brought on by the update and I'll start with the mini player. 

When you open iTunes you see a large window of all your media. If you would rather switch to the smaller mini player you need to hover your mouse over the play area and click the boxes that appear.


Yeah, intuitive I know. But that's how it's designed. With iTunes version 12.6 you will now see a slightly larger mini-player than past versions and it's completely devoid of any UI clues. 


Again, What was Apple thinking? How are you suppose to know what the controls are or what to do? If you hover the mouse over the window things change and now you see this view:


This makes things a little clearer but based on this view you have no idea what will play if you hit the play button. Is it a song, a movie, a TV show?  What??? The most egregious sin of all: Where are the open and close, red, yellow and green buttons in the upper left? How do you close the window to get the large media view back? Good gosh Apple, can you at least be consistent in your UI? PLEASE?!

The key here is to select the ellipsis, that's the 3 little dots on the left by the speaker icon.


If you select "Hide MiniPlayer Large Artwork" EVEN THOUGH IT"S NOT SHOWING, the view changes again.


Why look at that! The close butting has returned in the upper left. If you close the window, the large view of all your media reruns and you are back to where you started. Obvious isn't it?

OK, now that we have some way to control the MiniPlayer what about TV shows? In the past every episode of every season of your TV show showed up when you clicked the icon of that show. Now just the last watched season and it's available shows will be displayed. 


If you select the currently visible season (SEASON 6 in the example above) you will now see all available seasons for that show.


In this case I think this change is an improvement. It prevents shows like The Simpsons, 28 Seasons and counting, from taking over you monitor. By only showing one season at a time your scroll time is decreased.

What ever changes Apple makes in their software I just wish they made it a little clearer what changed and how. I'd also appreciate a little effort to unify the behavior of the UI so you don't have to hunt around to figure out how to get things to work.

Are you listening Apple?


SaveSaveSave
SaveSave

1/27/17

Beyond Basic Find: Advanced Searches


MacOSX has a great search feature called Spotlight. If don't use it you should. It's powerful and has a lot of options. You can learn more about Spotlight here

However there are times when you want to do a very specific search and for that you either need to use a powerful commercial application like HoudahSpot. It has a lot of options and gives you a lot of flexibility but unless you do a lot of searching it might be overkill.

Mac OS X does have some great search features if you know how to use them. That's what I'm going to talk about today.

  
Start your search by opening a finder window and typing the standard Mac shortcut for find -  Command+F.

Click on the "Name" Dropdown menu and select "Other…" 

This will bring up a menu of search options. There are a lot of options. Scroll through the list to see what search variables are available.


In this example I wanted to find all the ripped movies that were HD. To do that I knew I needed to find any file that had a height of 720p or 1080p.  It isn't obvious but the variable to search for is Pixel height and/or Pixel width. To enable that search function just click on the "In Menu" checkboxes on the right.

High definition movies today are 4K or higher. That means the display device or content has a horizontal resolution on the order of 4,000 pixels. Old school says that 720p (720 pixels) or 1080p (1080 pixels) are  still high def. Or at least they are by my ancient TV standards.

In case you need a refresher:

1080p Movies = 1920x1080
720p movies = 1280x720

In some cases movies use a different aspect ratio so if you want to find any movies that are 1080p you need to search for "Pixel Width = 1920".  The height might actually be less than 1080. 

In my case, I wanted to find all my HD movies in a specific folder so I searched for any file that had Pixel Width greater than 1280. 

Play around with the search attributes. By combining variables you can make complex a lot of variables into something you can use. If you plan on using the same search over and over remember to click that "Save" button so you can use it again. 


11/19/16

Please Disturb

If you value your sleep you probably configured your iPhone to use the "Do Not Disturb" function. iOS allows you to silence all calls, texts and alerts for a specific time period. But what if you want to allow calls or texts through even if "Do Not Disturb" set up and active?


Recently, my pregnant daughter asked my wife to help her during birth. Kind of an assistant doula if you will. Since most births occur during the wee hours of the morning my wife needed to set up her phone to allow calls and texts to come through even when "Do Not Disturb" was set.

Before iOS 10 the only way to allow users to call you was to open "Settings", navigate to "Do Not Disturb" and select "Allow Calls From"


BUT...you could only allow calls from all the people in your favorites or a select a specific group you wanted to grant access. If you only wanted one person to have access you would need to set up a brand new group and add that one person. Starting with iOS 10 you can now grant access to a single person inside your contacts application.

Open "Contacts" and select the person you want to grant access and Edit the contact. Now you just need to select "Ringtone"  and make sure the "Emergency Bypass" is selected. If you want to allow Texts through as well just edit the "Text Tone" the same way and enable the same "Emergency Bypass" switch.


That's it! Now even if it's the middle of the night that persons calls and texts will make it through and you won't miss the birthday party!


10/3/16

MacOS Sierra - Gatekeeper Security & Downloaded Apps

MacOS Sierra has been out for a while and most of you have probably downloaded and installed it. One of the focus areas of Sierra is security. Apple has plugged some security holes and added new features to protect the user from security threats as well as self inflicted damage. 

In the past Mac users touted the innate security of the UNIX undermining of MacOS vs. the sieve that was Windows. Five or ten years ago that was true. Not so today. Today the Mac is targeted just as much as Windows but thanks to the UNIX base of MacOS it is still harder to crack, but not impossible. Especially if the user is the one installing the Malware. 

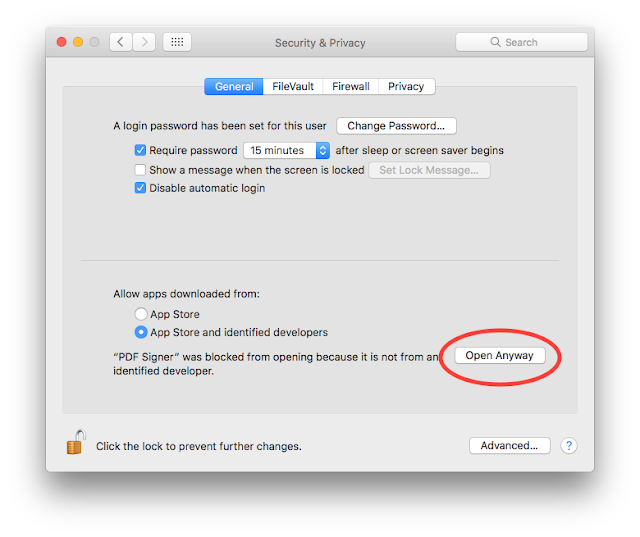
Every time you download and run an application you are trusting that the creator of that app doesn't have any ill intent. Most of the time you are right and everything is OK. But recently there have been some applications that have been loaded with software that isn't so friendly. To prevent that, Sierra has a built in Gatekeeper that prevents the user from running unsigned applications. That's a good thing but it can sometimes be a pain. If you have ever downloaded an update or application from the Internet and were unable to open it then this tip is for you.


The first thing to know is that you can still open any app you want with a minimum of hassle. After you try to open an app and it fails, go to the System Preferences and open the "Security" Tab. It should show the last application you tried to open and a button saying "Open Anyway" Just click that and try again. 


If you want to have the ability to bypass this step and open any application, regardless of where it came from then you need to use the terminal to disable the Gatekeeper default settings. 

If it is open close System Preferences and open the Terminal application (usually located in the Utilities folder). Type the following command: "sudo spctl --master-disable" without the quotes. 

After you hit return you will be asked to enter your password. Once you do that reopen System Preferences and you should see the a third pick under the security tab allowing you to open downloaded apps from anywhere. 

Just remember that just like Uncle Ben said "With great power comes great responsibility"  Know where you are getting your applications and make sure that you don't inadvertently give some Phishing scam access to your computer. 

If you want to go back to default setting you can open the terminal again and just type "sudo spctl --master-enable"

I hope this tip is helpful but remember to keep safe out there.