5/22/11

Backups - Choosing The Right Software

Knowing that you need to backup is one thing, actually getting around to setting it up and doing it is another. That's why you need to pick the right software for you. It's got to be something  you will use and better yet something you can set up once and will automatically do the backups for you. 


There are a lot of good applications out there for backing up a Mac. Each of the programs have slightly different features and although all will do a decent backup, each have their own strengths and weaknesses. Just remember that there is no one tool that's perfect for everyone. Pick one that will work for the way you intend to do backups. Below I've listed some of the better known applications as well as some that a bit more obscure. For each application I've listed the current price and URL where you can download it.


First up is Apple's own Time Machine.


Time Machine - Free

Time Machine is built into the latest versions of Apple Mac OS. It's already there in your applications folder, it's free and easy to use so you might as well use it. Just remember that Time Machine backups up everything that's changed on your Mac in the last hour. And does this every hour of every day that your Mac is turned on. 

Open up System Preferences and click on the Time Machine icon to start setting things up. For the first set it up Time Machine asks for a destination drive and that's it. Just know that the first backup will take a while to complete because it's backing up everything! 


Time Machine creates a folder on the external drive whose name contains the current date and time. It then copies the entire primary hard drive (except for files and directories that it has specifically been told not to copy) to the folder. Every hour thereafter, it creates a new folder on the remote drive using the same naming scheme, but instead of making another complete copy of the primary hard drive, Time Machine instead only backs up files that have changed. You will need a second hard drive of equal or greater size to make this work.


Because 1 hour increments for backup can get annoying and eat up HD space you might want to use a program like:

TimeMachineEditor - Free

TimeMachineEditor is a software for Mac OS X 10.5 Leopard and Mac OS X 10.6 Snow Leopard that lets you change the default one-hour backup interval of Time Machine.
You can change the interval or create a more sophisticated scheduling that works for you.


SuperDuper is a great program that can make a fully bootable backup. That can be a life saver if you loose your main hard drive. It has a built in scheduler that's easy to use. If you use it in conjunction to Time Machine you can have your incremental backup and store a bootable backup alongside your Time Machine volume—and it runs beautifully on both Intel and Power PC Macs!
SuperDuper's interface confirms all your actions in simple, clear language to ensure that the end result is exactly what you intended. 


SilverKeeper - Free

SilverKeeper is free backup from LaCie. You can use it with any storage device that mounts on a Mac desktop. You can backup to  a hard drive, a CD-R/RW, DVD-R/RW/RAM, or other removable storage device with a FireWire, USB, IDE, ATA interface.  You can also create backup sets and schedule your backups. The features are more then adequate for most people and the price is right. 


Carbon Copy Cloner - Free

CCC 3 features an interface designed to make the cloning and backup procedure very intuitive. In addition to general backup, CCC can also clone one volume to another, copying every file to create an exact replica of your source volume.
Deja Vu - $29

Deja Vu is a little different in that it's a "preference pane" that lives in your System Preferences. It allows you to schedule unattended backups of important folders, or even your entire system. It allows you to mirror your data (deleting any file in the destination that's not in your source) and give you a different data sets for daily weekly or monthly backups. 


iBackup - Free

iBackup the software tool shouldn't be confused with iBackup the online backup storage company. iBackup software doesn't have the most Mac-like interface but it works. Since it's free you can download it and play around to see if this is the backup program for you. It allows for simple to set up scheduled backups of files, folders, applications or anything else you want to back up.


Tri-BACKUP - $69

Tri-BACKUP is let's you do an automatic backup of data as well as entire disks. It has dual modes: A simplified interface that let you do quick and easy setups or a more complex manual mode for a configuration of your backups. 

It's kind of pricey for my tastes but if you have a small business or a lot of data you might to give it a try. 

5/12/11

Quick Update - Apple Store Bellevue Expanding

It looks like the Apple store in Bellevue Square is getting new digs. Anyone who has visited that store during the holidays or for product launches knows it's way too small.  According to some online sources the new store will be on the second floor directly opposite the new Microsoft store and will be twice it's current size. The projected opening is sometime around the 1st of the year. Here's hoping it will be open for the 2011 Christmas shopping season!


You can read more about it here:

5/7/11

Backups - Choose your Destination

A backup is like religion - when you need it most and don't have it, you become a true convert and wonder why it took you so long. I've had my bacon saved by a backup more times than I would like to count. Take it from personal experience and do a backup now before disaster strikes. And be sure about this, disaster will strike!! 


Maybe you've been thinking you're safe and you can just reload your system if something goes wrong. Sure you can reload your OS from an Apple restore disk but what about your personal data? What are those pictures from your last vacation worth to you? How about all your music or video files? Some are irreplaceable and if you lose them, they are gone forever. So protect yourself, your pictures, and your data, and do a backup.


When starting a backup for the first time, one of the things to decide is what are you going to back up to. Will you backup to a DVD or CD? Will you backup to an internal or external hard drive? Maybe you should use one of the many online backup services. My answer to these questions is: Yes! All of them should be part of your plan. If you think that's overkill then you've never had your hard drive crash and loose all your data. By spreading out your options you get the best chance to recover your data when things go wrong. With the right backup plan it won't be a chore to have multiple backups. So let's talk about those destination choices. 


Using DVDs for your Backup


If you have a 1TB hard drive and want to backup all your data to DVD it will take a while. Oh, and by the way, you will need over 200 DVDs. 200 DVDs is two 100 packs worth of disks and at Costco sale price it will run you about $40 for every backup. That isn't a lot of money to keep your files safe but in this economy it's not chump change either. Because of cost and time you  may be  tempted to only backup part of your data. That's OK. Having some of your data backed up sure beats having none of it backed up. Just be sure to store your DVD/CD somewhere where they will be safe.  


One thing to consider about DVDs is that the data stored on it may not be as permanent as you think. Did you know that DVDs fail? Over time, even if the disks aren't scratched or broken, DVDs can stop working and that time varies by manufacturer. "Only 47 percent of the recordable DVDs tested indicated an estimated life expectancy beyond 15 years. Some had a predicted life expectancy as short as 1.9 years." Do you really want to risk losing all your data after only 2 years? All in all backing up to DVD can be an easy way to backup smaller amounts of specific data but it isn't the best way to do regular backups of all your data.


Backing up to a Hard Drive


Backing up to in internal or external hard drive is probably your best option for backing up everything you have. Hard drives are cheap these days and run you pennies per GB. Backup is fast, convenient and allows you to have incremental backups. You can backup every hour if you want which will allow you access to the most up to date files if you need them. If you use Apple's Time Machine you won't even have to buy software. It's included with the OS. The big down side is safety. Aren't you backing up because you fear your main hard drive will fail? And now you are trusting another  hard drive to backup to. So using a hard drive is cheaper and faster than DVDs but there are still risks.


There are other safety considerations other than outright hardware failure.  Because hard drives are attached to your computer they might perish along with the computer in a fire or flood. In the event of theft they might be stolen along with your computer. If you want 100% assurance that your data will be there when you need it you may need to make multiple backups and keep one hard drive off site.


Off site Backup


So one key to a successful backup plan is to have off site storage of your data. You can backup some of your data to DVD and store it somewhere else.  If you can afford it, buy two hard drives. Keep one and do regular daily backups and use the other to do a full backup, then have a friend or relative keep it at their house. The problem with that is both DVDs and hard drive off site backups is that  you need to continually do a manual backup and move it to another location.  Unless you do it frequently your data will be out of date when you need it. Maybe one of the online backup services is a better choice. Especially if you are a procrastinator and won't don't make that second backup when you should. 


There are a lot of online backup services available. Some, like Apple's own MobileMe, have a limited capacity. Others like Carbonite, Mozy or Crashplan have the ability to backup your full hard drive but you pay a lot more for the service. Another thing to consider is security. Do you trust the online backup with your personal data? Are you SURE no one will have access to it that isn't authorized? Your data may be encrypted but there have been many cases about hackers getting personal information from online services.  Make sure you don't delude yourself into thinking that no one would ever be able to get to your data.  Just because some online company assures you that will never happen doesn't mean it won't happen.  Online backup is a great solution if you have the money to spend, a fast Internet connection and are willing to trust an online service with your precious data.


As you can see each backup destination has some gaps. But if you use a combination of all three backup types you can cover those gaps and give yourself the best chance of recovering data when you need to. 


I've only scratched the surface of the backup topic. Over the next few days I'm going to go into more depth and publish a series of articles about how to do backups, what software you can use and some easy methods to get started. I hope you'll be back to read them.

4/29/11

Sending a Text From Your Computer to a Cell Phone


Cell phones have had the ability to text for a long time and use a system called Short Messaging Service or just SMS to accomplish the task. For some reason texting is the preferred method of communication for teens. Maybe it's to prevent monster cell phone bills, but you don't need a cell phone to text someone. You can use your computer.


Using a computer offers some real advantages; It lets you use a full sized keyboard, doesn't cost you anything, and lets you keep a copy of your message in your email outbox. There's a couple of different ways you can text someone using a computer:


Use email


When you send a text via email you need to know two things: the phone number and the service (ATT, Verizon, T-Mobile, etc) that number is using. Open a new email and enter the phone number, the "@" symbol followed by the gateway of the particular service. 
For a full list of SMS & MMS gateways go here.

Most services have about a 160 character limit so keep your messages short! Delete your normal signature and any extra lines that may show up.


Use iChat or other chat program

Open the iChat buddy window and select the contact you want to send a text to. As long as you entered their cell phone number in your contact information you can send a text message. Just "Control-Click" the name and menu will appear. All you need to do is select "Send SMS."


A chat window will open up that looks like the standard chat window. Just type your message and hit return.  Any response will appear in the same chat window.

If you want to text someone that's not in your contact list you can use the phone number directly,  just make sure to add "+1" in front of the number. This works for chat programs like AIMAdium and Yahoo Messenger

Often when I show people how to text from your computer they get very excited and start texting right away. Then about an hour later I get a phone call asking "Why can't I send a picture?"  Ah yes, cell service companies don't make it easy on you because they want to be able to charge you extra for ever possible service. Of course if you are sending to an iPhone you can just send a picture to that persons email account but you can also use something called MMS. This also works for non-iPhones that don't have an email client. 

SMS is just for sending textual information. If you want to send a photo you need to use a service called Multimedia Message System (MMS).  Like SMS, MMS uses a gateway but the service is not the same.
  
The MMS file limit on the ATT network is about 3MB so make sure you don't send some huge file.  

Here's the hard part, most people use the JPEG format for pictures, but sending JPEGs from a computer doesn't always work the way it should. Since we use ATT in my house I've only tested that service but here's what I found:

  • No - If you send a MMS message using Apple Mail it will only work if you use the PNG format. Don't ask me why, but if you send a JPEG it won't work. 
  • No - If you use Thunderbird or an old copy of Eudora mail application it also fails for JPEGs.
  • No - If you use the web version of Mobile Me, JPEGs fail to send.
  • No - If you use the web version of Comcast mail JPEGs fail to send


Here's what works

  • Yes - If you use Apple Mail and attach a picture in the PNG format 
  • Yes - If you use Office for Mac and use Outlook JPEGs work just fine!!
  • Yes - If you use web mail application like Google Mail you can send JPEGs. 
  • Yes - Heaven forbid, if you use a PC and Microsoft Office sending JPEGs works fine.


As you can guess there's a lot of testing that I need to do to figure out if the same problems happen using Verizon or T-Mobile but I don't really have the time. Just guessing I would say that Apple has done something to Mail and MobileMe that somehow creates a format that is incompatible with MMS & JPEGs.

If you do use Apple Mail like I do here's an easy way to convert a picture from JPEG to PNG. Open your JPEG using Preview, select "Save As" and pick "PNG" from the drop down "Format:" menu and save a copy.


For now I'm sticking with Apple mail and PNG. It's easy and it works. Later on, if I find a fix that works consistently using JPEGs I'll post a follow up. In the mean time leave me a comment and let me know what works for you.

Happy texting!!

4/23/11

Ripping DVDs - Tips & Tricks

I thought I'd follow up my post about ripping DVDs with some solutions to some of the more common problems that pop up when you rip DVDs. In the process I'll walk you through some of the more advanced settings in Handbrake. 


Here are a few questions I've been asked before and how you can change the settings to solve them.


The sound quality isn't very good. How do I fix it?


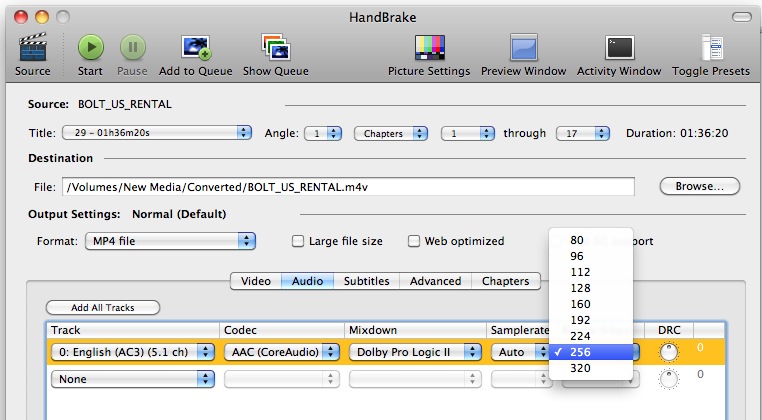
Many movies and TV shows are nonstop action and massive explosions so having the best quality sound isn't always required. Some movies star Keanu Reeves and you may not want to hear any dialog. But some movies have a great soundtrack or maybe the dialog is just muddy and you want to improve it. To get the best sound go to the "Audio" tab in Handbrake and bump up the quality.


I use 224kbps or 256kbps when I want better quality. It will make the file larger but if you want some punch out of the soundtrack or crystal clear dialog, it's the way to go.


There are 99 Titles which one do I pick?


Even though ripping your DVDs is legal doesn't mean Hollywood wants to make it easy to do. Disney DVDs are usually the culprit here but many Hollywood studios try to use subterfuge to prevent you from making copies of your own Movies. This is kind of strange to me because Disney of all people should understand the need to keep fragile DVD disks away from little kids. How many times have you tried to read a scratched or cracked DVD and it doesn't work? That's one of the big reasons you should back up your disk or make a digital copy, so your kids don't ruin it. 


If you open Handbrake and select the DVD as the source and see something like this,


don't panic. You can easily figure out which of those 99 titles is the right one to rip. 


Open DVD player and after all the introduction, coming attractions, and ads for stuffed animals are over start playing the movie. Once it's started to play, pause it and go to the "Go" menu and look at the "Title." Whichever title is selected is the one you pick in Handbrake. In the case below, it's title number 29.


When I play my movie everything looks squished. How do I fix it?


First let's talk about aspect ratio. That's the ratio of the width to height of a movie. Today's movies usually have an aspect ratio of 16:9. If you watch old TV shows they have an aspect ratio of 4:3.  Why do you care about this? Well, the aspect ratio of the original movie might be different than the screen you are watching it on. That can make your ripped movies or TV shows look squished if you don't take it into account when you rip a DVD. DVDs are encoded differently when you buy the widescreen version. This is how Wikipedia describes it:


"A DVD labeled as "Widescreen Anamorphic" contains video that has the same frame size in pixels as traditional fullscreen video, but uses wider pixels. The shape of the pixels is called pixel aspect ratio and is encoded in the video stream for a DVD disc player to correctly identify the proportions of the video. If an anamorphic DVD video is played on standard 4:3 television without adjustment, the image may look horizontally squeezed."


What you need to do is set your video to encode using anamorphic processing.  Quoting the Handbrake manual: "... 'anamorphic' means the movie doesn't have a single, native shape that you watch. Instead, it shape-shifts. If you're watching it on a standard TV, it morphs to fit it. When you play it on a widescreen TV, it morphs to fit it, too."


Here's how you set things up to encode using anamorphic settings.  First load your DVD, make all your usual settings then go to "Picture Settings" and "Size."


You just need to make sure is that Anamorphic is set to either "Loose" or "Strict." Strict is more precise but Loose is more flexible. Just stick with "Loose" and you will get a movie that always looks good no matter what screen you watch it on.


How do I get rid of those lines on the screen?


Those lines are there because of something called Interlacing. It's a common way to compress video. Each frame of an interlaced video signal shows every other horizontal line of the image. As the frames are projected on the screen, the video signal alternates between showing even and odd lines. When this is done fast enough, i.e. around 60 frames per second, the video image looks smooth to the human eye.


Those lines usually show up when you rip an older DVDs or in animation. Before you hit the start button it's always a good idea to open the "Picture Settings" icon in Handbrake and use the "Preview" button to view the movie and see if the movie has bad interlacing. Here's an example from one of my kids favorites, Rescue Rangers. 


Notice the double image and interlacing? It's annoying in the extreme. To get rid of it just open "Picture Settings" and click the "Filters" button.


It's counter intuitive but don't pick "Deinterlace". Use the slider and pick "Decomb" and "Default". When you process your file it should solve your problem.  Decomb uses a method to search for interlacing problems and only fix those frames that need it. If you use Deinterlace then it will deinterlace every frame making for a lower quality picture. You can read more about it here.


How do I rip TV shows on DVD?


Movies aren't the only thing people like to watch. DVD sets of your favorite TV shows are a hot seller and even old shows are getting a new life on DVD. To rip your TV shows from DVD here's what you need to know. 


Today's "hour" long TV shows are usually about 41 minutes long. The "half" hour shows are about 21 to 23 minutes long.   As you might guess if you've been a TV watcher for a while, the newer the show the shorter the length. An episode of "I Love Lucy" might be 25 or 28 minutes long but "The Big Bang Theory" is only about 21 minutes long or as short as 19.  what you need to look for is a consistent set of titles that are about the same length. Just insert the first DVD of your TV show and look for a bunch of titles that are about the same length.  


In the case above titles 3-10 are all about the same length and based on the description on the case match perfectly with the number of episodes on the DVD. Just select the first one and make all your settings then click the "Add to Queue" button. Then select the second, make sure the settings are all OK and add it as well. Go through and add all the episodes until you have them all in the queue.  IMPORTANT - Just make sure you type in a unique name for each title so they don't overwrite each other.  Once you are finished adding them to the queue just click the "Start" button and they should all process like normal.


Here's a second hint on TV shows, if you are picky you can always use the same trick I wrote about above in the "99 titles" question. Open up the DVD in the Apple DVD player, start the specific episode and check which title is playing. That way you will know which episode is which. It will take more time to do but is a sure fire way to get it right.