7/30/11

Mac OSX Lion - A few Finder tips and Tricks

Show Status Bar in Finder Windows

The new Mac OSX Lion operating system has a lot of new features but looks enough like the previous version of the operating system to throw you for a loop if you expect to see something and it isn't there. A great example of that is hard disk information.

In 10.6 Snow Leopard, at the bottom of every Finder window is a list of how many items are in the window and a total of the space available on whatever disk the window contents are located on.
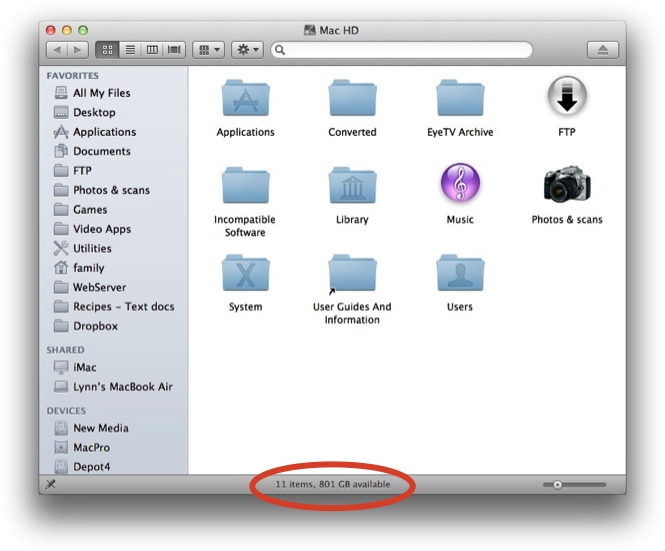
Finder.jpeg

By default Lion doesn't show this information. To get it back select the finder window, go to the top of the screen and select "View". Then select "Show Status Bar." That's it!
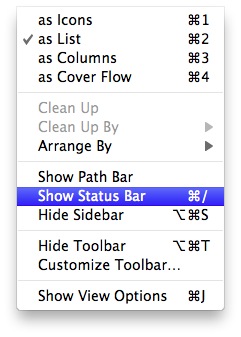
Show_Status_Bar.jpg

Change Finder Sidebar Icon Size

Another change that Lion sets by default is the size of the icons in the Finder window sidebar. Here's a picture of the Lion sidebar showing the default size

Sidebar Med.jpeg

To save a little space you can adjust the sidebar icon size using System Preferences. Just open System Preferences and go to General. Just change the sidebar icon size to small.

Sys Pref Sidebar.jpg

Now your Finder windows will look like this
Sidebar Small.jpeg

Configuring Finder Sidebar

The Finder sidebar also now contains a bunch of new icons and by default it's missing some old ones. To change that configuration you just need to click the background to bring up Finder then open Finder Preferences.

In the Sidebar menu you can add or delete menu items. For me, showing the machine Hard disks as well as other connected servers is a must so just check the appropriate Devices & Shared items. You can also add or delete folders you want to have at your fingertips whenever you open a finder window.

Finder Prefs.jpg

What is the same as older versions of Mac OSX is the ability to add items to the sidebar. Just drag folders you want to display to the sidebar and they will always be available for easy access.
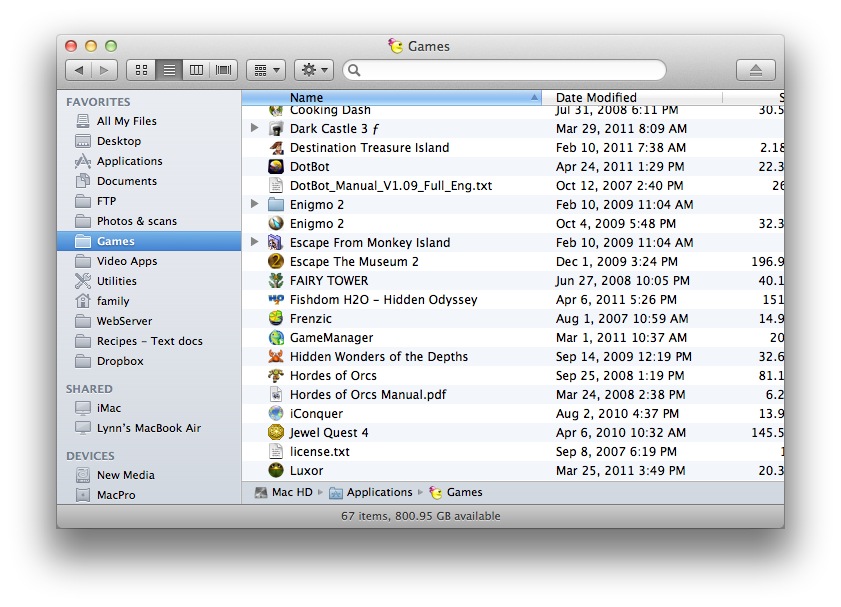
Sidebar Games.jpg

The best thing to do with a new operating system is to explore and test things out. See if you can find a new function or option that you love (or hate) and drop me a comment below to let me know. I'll try to share some of the best so everyone can benefit.

7/25/11

Mac OS Lion - Creating a Lion Boot/Install Disk

One of the new "features" of Apple's new Lion operating system is it's total lack of physical media. The only place you can get Lion is to download it from Apple via the App Store. That's great for Apple as it saves the cost of creating, packaging shipping and displaying the boxed media. For the end user it's a mixed blessing.


It's great because you always know where to go get another copy. No more searching for your install disk. Just log into your Mac, fire up the App Store and download it again. The down side is that if you have a slow Internet connection or you have a lot of family Macs to load (you can install Lion on all your machines using your AppleID) it can take a while. If you have 4 or 5 Macs in your family like I do then downloading that 4GB file over and over again would be a real pain in your ethernet. To help you get around that problem you can download it once then create an install disk. 


Here are the steps to creating a Installation DVD. You can follow the same basic steps and also create a bootable flash drive if you want, just make sure it's greater than 4GB in size.


  • Purchase and download Lion from the Mac App Store. When downloaded it will be added to your Dock and Applications folder. Make sure you don't install Lion! Instead close the installer.

  • Go to the Applications folder and locate the Install Mac OS X Lion package.

  • Right-click the installer and choose Show Package Contents. 

    • Go to the /Contents/SharedSupport/ folder and locate the InstallESD.dmg disk image.

    • Drag "InstallESD.dmg" to your desktop


    Now you need to create a Boot DVD 


    • Open Disk Utility. 

    • To burn the image to DVD, click the Burn button in the Disk Utility toolbar and select the "InstallESD.dmg" file you dragged to the desktop . Insert a blank disc when the burn dialog displays, and then click Burn (be sure to have Disk Utility verify the burn to ensure the media works as it should).

    • Now you can take your disk to all your Macs and update to Lion. When you are done, just make sure to store your disk somewhere safe.


    7/23/11

    Mac OS 10.7 Lion


    Since this is a Mac blog & you are reading this post I figure you have heard that Apple released a new operating system last week; code name Lion. This is the seventh iteration of their OSX operating system and it's got a lot of changes in it. Most users will be happy with the changes but as with anything new, it might take a while to adjust to the changes. If you haven't upgraded yet you need to make sure you are prepared.


    The first thing you can do to get ready is weeding out all those unwanted applications and data and doing a general clean up. Then, after you're done cleaning up do a backup. You do backups on a regular basis don't you?  If not, you can read through my posts about backups here and here. As a general rule ALWAYS do a full backup before a major OS upgrade.


    The next step may be painful but stick with me. Lion is a new OS and is getting rid of some of the old legacy code. That means some of your older applications may stop working. If you count on an application in your day to day computing life then it's good to check to make sure it will work after you upgrade.


    Back before Apple switched to Intel as the Mac CPU of choice they used chips made by IBM/Motorola called PPC (short for PowerPC or Performance Optimization With Enhanced RISC Performance Computing). That means appications that you rely on might stop working when you upgrade to Lion. To keep from shooting yourself in the foot it's a good idea to check before you upgrade. Here's how to check for PPC apps on your computer:


    Go to the Apple menu and open "About This Mac."  


    When the window opens click on the "More Info" button. That will bring up the system profiler application. Click on Software and sort by kind and you will see a list of all your applications. Those that are "Universal" or "Intel" will work fine in Lion. Anything that is PPC will not.

    If your favorite app is listed as PPC it might be time to find a replacement or see if an upgrade is available. For me that meant finally abandoning my old version of Quicken 2006 (yeah I was too cheap to even upgrade to Quicken 2007). Just know that the new upgrade for Quicken 2006 & 2007 , Quicken Essentials for Mac, doesn't have the same features as the much older version. I don't know why Intuit is so slow to upgrade the Mac version to match the Windows version but they haven't. Here's a good article about Quicken Essentials and some of its shortcomings.  


    That's just one bad example. Most of my day to day applications just needed an upgrade and they are Lion ready. I did loose some of my old games but that's life when you hang onto a game that's over 15 years old. Here's a quick look as some of the major players that are PPC:


    • FileMaker 6
    • FileMaker 8
    • Older Adobe software
      • Photoshop CS1, CS2 etc
      • Creative Suite older versions
    • Microsoft Office 2004

    After you weed through and delete your old data and applications, you check for PPC applications and upgrade or replace them, and you do a backup, you should be ready to update your computer to Lion. I'll review that upgrade process next.


    My plan is to offer up some tips and insight on Lion over the next few weeks. But that may get stretched out since the weather here in Seattle is finally improving and the weatherman says the temperature might actually reach 80°!!!  After living in perpetual fall-like drizzling rain and cloudy days for the past 11 months it's tough to spend time in front of a computer. 

    6/25/11

    Fastmac U-Socket USB/Power Outlet

    Back in December of 2009 (is that really almost 2 years ago?) I found an online article advertising a very cool product that I fell in love with. Fastmac corporation had combined a standard 110V power outlet with 2 USB ports and called it U-Socket. I glanced around at my computer area and took note of the tangle of cables and huge number of power adaptors and decided I needed to get me some of these!


    Fastmac offered an introductory price of $9.99 per outlet but pre-order wasn't available. A coupe of months later they did offer up a pre-order but the price was now $19.95 each. I thought about it for about 10 seconds and then plunked down the $40 and sat back and waited for them to arrive. I waited. And waited ... and waited. 

    It turns out Fastmac had a great product but the US government needed them to make changes. Great for safety not so great for delivery quick delivery times. The USB ports went from a horizontal orientation above each outlet to a vertical orientation to the left side of each outlet. Not a big deal one would think but if you have to go through testing, verification and the US government approval process it can take a while. It also impacts the price. They now sell for $22.95 and come in a variety of colors. About 2 weeks ago I finally was  notified that the U-Sockets I had pre-ordered were available and they were on their way. I installed them today. 

    Each outlet comes with a wire nut, an extra wire in case your outlet is in the middle of an electrical run, a faceplate, the outlet itself and instructions.


    If you are a DIY type of guy then it shouldn't be an issue to install them yourself. Just make sure you keep safety in mind and TURN OFF THE POWER FIRST!  To install the two outlets took me about 20 minutes. The biggest issue is the size of the outlet. It requires at least a 16-cubic-inch electrical box to accommodate it. That means you may have to swap out a smaller electrical box for a larger one. Not necessarily an easy task.  Thankfully for me that was unnecessary.


    The two USB ports are USB 3.0-compliant, have 12W of total charging power and are rated at 2.1A.  My brand new iPad 2 can charge at full speed but if/when I get a second one it will slow things down a bit as they would share the power draw. 

    Another nice feature of the U-Socket is that it's designed to cut off power to the USB ports when nothing is plugged into them. That should put a stake through the heart of those vampire charging adaptors you leave in all the time.


    U-Socket is a great device, easy to install and unique in the market right now.  If you’ve been looking for a convenient way to charge all your i-devices and hate the mess of USB charging adapters, give it a try.

    5/22/11

    Backups - Choosing The Right Software

    Knowing that you need to backup is one thing, actually getting around to setting it up and doing it is another. That's why you need to pick the right software for you. It's got to be something  you will use and better yet something you can set up once and will automatically do the backups for you. 


    There are a lot of good applications out there for backing up a Mac. Each of the programs have slightly different features and although all will do a decent backup, each have their own strengths and weaknesses. Just remember that there is no one tool that's perfect for everyone. Pick one that will work for the way you intend to do backups. Below I've listed some of the better known applications as well as some that a bit more obscure. For each application I've listed the current price and URL where you can download it.


    First up is Apple's own Time Machine.


    Time Machine - Free

    Time Machine is built into the latest versions of Apple Mac OS. It's already there in your applications folder, it's free and easy to use so you might as well use it. Just remember that Time Machine backups up everything that's changed on your Mac in the last hour. And does this every hour of every day that your Mac is turned on. 

    Open up System Preferences and click on the Time Machine icon to start setting things up. For the first set it up Time Machine asks for a destination drive and that's it. Just know that the first backup will take a while to complete because it's backing up everything! 


    Time Machine creates a folder on the external drive whose name contains the current date and time. It then copies the entire primary hard drive (except for files and directories that it has specifically been told not to copy) to the folder. Every hour thereafter, it creates a new folder on the remote drive using the same naming scheme, but instead of making another complete copy of the primary hard drive, Time Machine instead only backs up files that have changed. You will need a second hard drive of equal or greater size to make this work.


    Because 1 hour increments for backup can get annoying and eat up HD space you might want to use a program like:

    TimeMachineEditor - Free

    TimeMachineEditor is a software for Mac OS X 10.5 Leopard and Mac OS X 10.6 Snow Leopard that lets you change the default one-hour backup interval of Time Machine.
    You can change the interval or create a more sophisticated scheduling that works for you.


    SuperDuper is a great program that can make a fully bootable backup. That can be a life saver if you loose your main hard drive. It has a built in scheduler that's easy to use. If you use it in conjunction to Time Machine you can have your incremental backup and store a bootable backup alongside your Time Machine volume—and it runs beautifully on both Intel and Power PC Macs!
    SuperDuper's interface confirms all your actions in simple, clear language to ensure that the end result is exactly what you intended. 


    SilverKeeper - Free

    SilverKeeper is free backup from LaCie. You can use it with any storage device that mounts on a Mac desktop. You can backup to  a hard drive, a CD-R/RW, DVD-R/RW/RAM, or other removable storage device with a FireWire, USB, IDE, ATA interface.  You can also create backup sets and schedule your backups. The features are more then adequate for most people and the price is right. 


    Carbon Copy Cloner - Free

    CCC 3 features an interface designed to make the cloning and backup procedure very intuitive. In addition to general backup, CCC can also clone one volume to another, copying every file to create an exact replica of your source volume.
    Deja Vu - $29

    Deja Vu is a little different in that it's a "preference pane" that lives in your System Preferences. It allows you to schedule unattended backups of important folders, or even your entire system. It allows you to mirror your data (deleting any file in the destination that's not in your source) and give you a different data sets for daily weekly or monthly backups. 


    iBackup - Free

    iBackup the software tool shouldn't be confused with iBackup the online backup storage company. iBackup software doesn't have the most Mac-like interface but it works. Since it's free you can download it and play around to see if this is the backup program for you. It allows for simple to set up scheduled backups of files, folders, applications or anything else you want to back up.


    Tri-BACKUP - $69

    Tri-BACKUP is let's you do an automatic backup of data as well as entire disks. It has dual modes: A simplified interface that let you do quick and easy setups or a more complex manual mode for a configuration of your backups. 

    It's kind of pricey for my tastes but if you have a small business or a lot of data you might to give it a try. 

    5/12/11

    Quick Update - Apple Store Bellevue Expanding

    It looks like the Apple store in Bellevue Square is getting new digs. Anyone who has visited that store during the holidays or for product launches knows it's way too small.  According to some online sources the new store will be on the second floor directly opposite the new Microsoft store and will be twice it's current size. The projected opening is sometime around the 1st of the year. Here's hoping it will be open for the 2011 Christmas shopping season!


    You can read more about it here:

    5/7/11

    Backups - Choose your Destination

    A backup is like religion - when you need it most and don't have it, you become a true convert and wonder why it took you so long. I've had my bacon saved by a backup more times than I would like to count. Take it from personal experience and do a backup now before disaster strikes. And be sure about this, disaster will strike!! 


    Maybe you've been thinking you're safe and you can just reload your system if something goes wrong. Sure you can reload your OS from an Apple restore disk but what about your personal data? What are those pictures from your last vacation worth to you? How about all your music or video files? Some are irreplaceable and if you lose them, they are gone forever. So protect yourself, your pictures, and your data, and do a backup.


    When starting a backup for the first time, one of the things to decide is what are you going to back up to. Will you backup to a DVD or CD? Will you backup to an internal or external hard drive? Maybe you should use one of the many online backup services. My answer to these questions is: Yes! All of them should be part of your plan. If you think that's overkill then you've never had your hard drive crash and loose all your data. By spreading out your options you get the best chance to recover your data when things go wrong. With the right backup plan it won't be a chore to have multiple backups. So let's talk about those destination choices. 


    Using DVDs for your Backup


    If you have a 1TB hard drive and want to backup all your data to DVD it will take a while. Oh, and by the way, you will need over 200 DVDs. 200 DVDs is two 100 packs worth of disks and at Costco sale price it will run you about $40 for every backup. That isn't a lot of money to keep your files safe but in this economy it's not chump change either. Because of cost and time you  may be  tempted to only backup part of your data. That's OK. Having some of your data backed up sure beats having none of it backed up. Just be sure to store your DVD/CD somewhere where they will be safe.  


    One thing to consider about DVDs is that the data stored on it may not be as permanent as you think. Did you know that DVDs fail? Over time, even if the disks aren't scratched or broken, DVDs can stop working and that time varies by manufacturer. "Only 47 percent of the recordable DVDs tested indicated an estimated life expectancy beyond 15 years. Some had a predicted life expectancy as short as 1.9 years." Do you really want to risk losing all your data after only 2 years? All in all backing up to DVD can be an easy way to backup smaller amounts of specific data but it isn't the best way to do regular backups of all your data.


    Backing up to a Hard Drive


    Backing up to in internal or external hard drive is probably your best option for backing up everything you have. Hard drives are cheap these days and run you pennies per GB. Backup is fast, convenient and allows you to have incremental backups. You can backup every hour if you want which will allow you access to the most up to date files if you need them. If you use Apple's Time Machine you won't even have to buy software. It's included with the OS. The big down side is safety. Aren't you backing up because you fear your main hard drive will fail? And now you are trusting another  hard drive to backup to. So using a hard drive is cheaper and faster than DVDs but there are still risks.


    There are other safety considerations other than outright hardware failure.  Because hard drives are attached to your computer they might perish along with the computer in a fire or flood. In the event of theft they might be stolen along with your computer. If you want 100% assurance that your data will be there when you need it you may need to make multiple backups and keep one hard drive off site.


    Off site Backup


    So one key to a successful backup plan is to have off site storage of your data. You can backup some of your data to DVD and store it somewhere else.  If you can afford it, buy two hard drives. Keep one and do regular daily backups and use the other to do a full backup, then have a friend or relative keep it at their house. The problem with that is both DVDs and hard drive off site backups is that  you need to continually do a manual backup and move it to another location.  Unless you do it frequently your data will be out of date when you need it. Maybe one of the online backup services is a better choice. Especially if you are a procrastinator and won't don't make that second backup when you should. 


    There are a lot of online backup services available. Some, like Apple's own MobileMe, have a limited capacity. Others like Carbonite, Mozy or Crashplan have the ability to backup your full hard drive but you pay a lot more for the service. Another thing to consider is security. Do you trust the online backup with your personal data? Are you SURE no one will have access to it that isn't authorized? Your data may be encrypted but there have been many cases about hackers getting personal information from online services.  Make sure you don't delude yourself into thinking that no one would ever be able to get to your data.  Just because some online company assures you that will never happen doesn't mean it won't happen.  Online backup is a great solution if you have the money to spend, a fast Internet connection and are willing to trust an online service with your precious data.


    As you can see each backup destination has some gaps. But if you use a combination of all three backup types you can cover those gaps and give yourself the best chance of recovering data when you need to. 


    I've only scratched the surface of the backup topic. Over the next few days I'm going to go into more depth and publish a series of articles about how to do backups, what software you can use and some easy methods to get started. I hope you'll be back to read them.

    4/29/11

    Sending a Text From Your Computer to a Cell Phone


    Cell phones have had the ability to text for a long time and use a system called Short Messaging Service or just SMS to accomplish the task. For some reason texting is the preferred method of communication for teens. Maybe it's to prevent monster cell phone bills, but you don't need a cell phone to text someone. You can use your computer.


    Using a computer offers some real advantages; It lets you use a full sized keyboard, doesn't cost you anything, and lets you keep a copy of your message in your email outbox. There's a couple of different ways you can text someone using a computer:


    Use email


    When you send a text via email you need to know two things: the phone number and the service (ATT, Verizon, T-Mobile, etc) that number is using. Open a new email and enter the phone number, the "@" symbol followed by the gateway of the particular service. 
    For a full list of SMS & MMS gateways go here.

    Most services have about a 160 character limit so keep your messages short! Delete your normal signature and any extra lines that may show up.


    Use iChat or other chat program

    Open the iChat buddy window and select the contact you want to send a text to. As long as you entered their cell phone number in your contact information you can send a text message. Just "Control-Click" the name and menu will appear. All you need to do is select "Send SMS."


    A chat window will open up that looks like the standard chat window. Just type your message and hit return.  Any response will appear in the same chat window.

    If you want to text someone that's not in your contact list you can use the phone number directly,  just make sure to add "+1" in front of the number. This works for chat programs like AIM, Adium and Yahoo Messenger. 

    Often when I show people how to text from your computer they get very excited and start texting right away. Then about an hour later I get a phone call asking "Why can't I send a picture?"  Ah yes, cell service companies don't make it easy on you because they want to be able to charge you extra for ever possible service. Of course if you are sending to an iPhone you can just send a picture to that persons email account but you can also use something called MMS. This also works for non-iPhones that don't have an email client. 

    SMS is just for sending textual information. If you want to send a photo you need to use a service called Multimedia Message System (MMS).  Like SMS, MMS uses a gateway but the service is not the same.
      
    The MMS file limit on the ATT network is about 3MB so make sure you don't send some huge file.  

    Here's the hard part, most people use the JPEG format for pictures, but sending JPEGs from a computer doesn't always work the way it should. Since we use ATT in my house I've only tested that service but here's what I found:

    • No - If you send a MMS message using Apple Mail it will only work if you use the PNG format. Don't ask me why, but if you send a JPEG it won't work. 
    • No - If you use Thunderbird or an old copy of Eudora mail application it also fails for JPEGs.
    • No - If you use the web version of Mobile Me, JPEGs fail to send.
    • No - If you use the web version of Comcast mail JPEGs fail to send


    Here's what works

    • Yes - If you use Apple Mail and attach a picture in the PNG format 
    • Yes - If you use Office for Mac and use Outlook JPEGs work just fine!!
    • Yes - If you use web mail application like Google Mail you can send JPEGs. 
    • Yes - Heaven forbid, if you use a PC and Microsoft Office sending JPEGs works fine.


    As you can guess there's a lot of testing that I need to do to figure out if the same problems happen using Verizon or T-Mobile but I don't really have the time. Just guessing I would say that Apple has done something to Mail and MobileMe that somehow creates a format that is incompatible with MMS & JPEGs.

    If you do use Apple Mail like I do here's an easy way to convert a picture from JPEG to PNG. Open your JPEG using Preview, select "Save As" and pick "PNG" from the drop down "Format:" menu and save a copy.


    For now I'm sticking with Apple mail and PNG. It's easy and it works. Later on, if I find a fix that works consistently using JPEGs I'll post a follow up. In the mean time leave me a comment and let me know what works for you.

    Happy texting!!