There are a lot of Mac applications available that will let you connect to your Mac when you are away from home. All of the easiest to use applications have some sort of registration so you can find your Mac out of the millions that are using the Internet at any given time. Apple has one of the best remote access applications built into their OS. It's part of Apple's free iCloud service and called "Back-to-my-Mac", or just BTMM for short.
When you register each of your Macs with iCloud, and enable BTMM, the software allows you to access any of your Macs disks or share the screen remotely from where ever you are. If you are sitting on the Lanai of your beach condo in Hawaii and need a file from your home computer just connect to Mac and mount up your hard drive. Copy the file and you are done. Even better, if you want to operate your Mac remotely just click the "Share Screen" button and log in.
The one drawback to all this remote convince is trying to connect from a Mac that isn't yours or is associated with a different iCloud user back to your machine. The good news is that with a little preparation and the right software you can do it! To get things working you need to gather some specific information and set up your Mac.
The one key piece of information you need to know is your Mac's Internet address. This is a unique number that identifies you to the internet. Most Internet Service Providers (ISP) assign you a dynamic IP. That means that you will never know what it is on any given day unless you write it down. There are free DNS services that will associate a name to your IP address but thankfully, for Apple iCloud users, Apple does this for you! To find out your DNS name all you need to do is open up the Terminal application located in your Utilities folder and run a simple command.
 First off, don't be afraid of the command line. You just need to run one simple command, write down the information, then quit terminal. The command you need to run is the multicast DNS service discovery. It will figure out the DNS name associated with your iCould account.
$ mDNS -E
Looking for recommended registration domains:
Talking to DNS SD Daemon at Mach port 5891
14:42:11.478 Recommended Registration Domain local. Added
14:42:11.479 Recommended Registration Domain <.Mac ID>.members.mac.com. Added
14:42:11.479 Recommended Registration Domain XXXXXXX.members.btmm.icloud.com. Added
As of MacOS 10.7 Apple is still using the .Mac members DNS name even though it no longer works for this particular VNC use. The DNS name you need to copy is your iCloud DNS name. In the example above it's the last line. The results will have a unique number associated to your iCloud account name.
12345678.members.btmm.icloud.com.
12345678.members.btmm.icloud.com.
Now you need to make sure your Mac is set up. Open up the system preferences and select "iCloud" under "Internet & Wireless" and click the "Back to My Mac" check box.
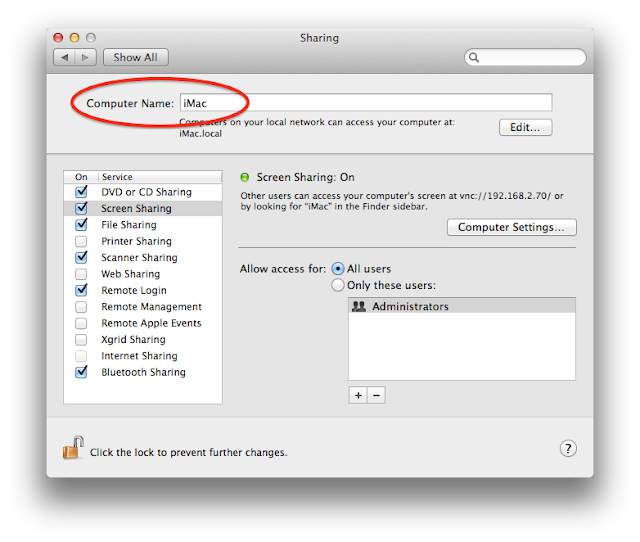
Because you can have multiple Macs associated with a single iCloud user ID you also need to identify which Mac you want to connect to. For each Mac associated with your iCloud user ID open "System Preferences" and click the "Sharing" tab. Write down the "Computer Name:" that appears at the top. In the case below it's just "iMac".
 Lastly you will need to enable VNC connections for your Mac. Select "Computer Settings" in the same "Sharing" Preferences panel, check the VNC box and type in a strong password. Because your machine is accessible from outside your firewall I suggest using upper & lower case letters, numbers and characters (!,@, #, etc.)
You are now set up and have all the information you need to connect to your machine using your favorite VNC app. One of my favorites is Chicken of the VNC. You can download it here.
Once the application opens just use the new connection command in the "File" menu. in the host: box type
<computer_name>.XXXXXXX.members.btmm.icloud.com
An example might be
iMac.12345678.members.btmm.icloud.com.
<computer_name>.XXXXXXX.members.btmm.icloud.com
An example might be
iMac.12345678.members.btmm.icloud.com.

When you connect you will see a login box. This is where you type in the VNC password you just set above.
If you don't want this box to appear you can enter your VNC password in the VNC Login screen and select "Remember Password." After your VNC connects you will see your Mac's login screen.
If you don't want this box to appear you can enter your VNC password in the VNC Login screen and select "Remember Password." After your VNC connects you will see your Mac's login screen.
Select your user and log in! If everything works as planned you should be now be logged into your machine.


After an update to Mac OS 10.9 I realized that the UNIX command executed from the terminal no longer works. Here's an alternate method to grab your btmm address. Just enter the following on the terminal command line:
ReplyDeletescutil --dns | grep btmm
It should return your BTMM address. BTW - the above command has two dashes in front of the dns. That's "- - dns" but without the space between the dashes.