5/21/13

Optimize Your WiFi Network Using NetSpot

Pulling CAT5 Wire through your home use to be a normal activity for the geeky homeowner. Now everyone uses WiFi. Using WiFI saves a lot time and effort but how do you know where to put your router? Is the signal weak in your family room? Do you have slow Internet speeds in your bedroom? Using a tool like NetSpot you can map your network, visualize the coverage and figure out the perfect configuration.


NetSpot is free and you can get it from the Apple App Store. As of this posting, the current App Store version is 1. 3.344. Version 2 is available directly from NetSpot. I have taken most screen shots below using the older version. I will make note when the screen shot is version 2.

It goes without saying that you must have a portable Mac with working WiFi to map your network. After you download the app start it up and you will be asked to create a new survey and either draw or load a map.

The drawing tools included in NetSpot are great but you can also use use a drawing program like iDraw or Intaglio to create your map. If you are a paper and pencil sort, you can also draw a map by hand, take a photo of it using your iPhone or iPad and import the file using the "Load a Map" function.

After you have the map loaded you will be asked to select two points and give the correct dimension between the two points.

Now you just need to start scanning. Click the "Start Scan" button in the upper left of the map, click your current location on the map and NetSpot will start scanning. 


A list of available networks will appear in the panel on the left and a green circle will show the location you just scanned. Now walk to a new location and click that point on the map. A new scan will start. Continue on until your whole area has been scanned.


Click the "Stop Scan" button in the upper left of the map section to stop active scanning. Now comes the analysis. 

If you are using version 2.0 you can use the Discover mode and just see the network information you have gathered. This is an improvement over version 1 and gives you a quick look at the raw numbers.


To see a graphic representation of the numbers you need to switch back to the Survey mode. Use the"Visualize" drop down menu and choose from various options.  Below is the graph of Signal-to-interference ratio.

The closer to the hot end of the spectrum you are the better your WiFi performance will be. You will also see where NetSpot thinks each of your routers is located. In my case I noticed that they seemed misplaced. Using the "Resume Scan" button I added more points on my map and got a better representation of their actual location. I have 3 routers on 2 floors. I have circled them in red. 


Don't be afraid to add a lot more data points. In this case more is better. By clicking on a WiFi hotspot you can get more information about that router.


If you are using version 2 then you get a pop up explaining what the definition is for each Visualization selection.


"The signal-to-interference ratio is similar to the signal-to-noise ratio, but in this case the interference is specific to co-channel interference from other radio transmitters."  

In plain English that could mean that you have a problem if your network channel is on the same frequency as your neighbor. If so you might want to change it. As you can see, by using the different plots you can easily figure out where dead zones might be, if you need a bridge repeater or if you have too many routers in one area. 


In general NetSpot does a great job of giving you a visual picture of your network. Getting the location of wireless equipment right always means a little trial and error and having a tool like this can really help perfect your configuration.
There is a paid for Pro version available with more features but for home use NetSpot is a great product.

5/6/13

Movie Effects - Quick, Easy & Free way to Rotate Video

With a Mac there are always at least 2 or 3 ways to do something. As time goes by, and new apps are created, there might even be a better way. Such is the case with rotation of video. I wrote a post a while back on how to rotate video using iMovie. Since iMove comes with your Mac when you buy it, using iMovie to rotate your video was an easy way to get the job done. 

Two years has passed since I wrote that blog post and the number of applications in the Apple Mac App store has exploded. I recently discovered a great little video editing application called Movie Effects that has a lot of features. One of which is rotating video.

The developers from Etinysoft list Movie Effect's key features as:
  • Whole window are available for dragging and dropping any video
  • Support almost all popular video formats such as mp4, mov, avi, flv, etc.
  • Freely apply more than one effects to a video.
  • Customize parameters of a part of effects to your desired level.
  • Directly preview video before or after effects being applied.
  • Add image as watermark at any point with effect “Image Watermark.
Go download a copy now and explore this great app. To help you out here's a walk through of how to rotate video. 

Open the application and at the main screen drag a copy of the video you want to rotate. 

In the left hand column click "Add Effects" and select "Rotation"

You will notice that rotation is just one of the options to change your video so feel free to play around. Once you have selected rotation there will now be several choices on how to rotate. Just make sure you preview your video before you process and save it. If you select 90° rotation and vertically flip it you will end up with this:

Opps! Selecting just 90° rotation you will get the correct orientation. 


Now that you have your video rotated you will want to save it. Select the save format at the bottom and you will see that there are a ton of formats available to you. Select the one you want and click save.


Just be careful with the choice you make. Some formats will change the aspect ratio of your video. For instance, selecting "Common Video" and "MPEG4 MP4" created this video

Opps again! For use on a Mac, going back and saving as iPhone, iPad or AppleTV format worked just fine. Again, explore experiment and see what works for you. 

That's it! your video is rotated with only a few clicks.  Movie Effects is a great application that lets you rotate your videos quickly and easily. Best of all it does a lot more then that and it's free!


4/22/13

How to Edit Your Playlist On Your iPhone

With the iPhone now a permanent part of my daily life one thing that has changed is music. Music is always playing in my house and because everyone now has an iPhone or iPod. 


Music sets a mood, makes someone laugh or can help set the tempo of a workout. Our normal mode of operation is to load up our iPhones, iPads and iPods with music by plugging into the computer and syncing up. You can do the same thing via WiFi or iTunes Match but we find it more convient and faster to just cable up. After you unplug and are on the go, one thing that isn't clear is how to change the order of your playlist. 

If you want to change your playlist on your iPhone just open up the playlist and click the "Edit" button. 


You can delete a song by selecting the red circle beside the song then hitting the red "Delete" button that pops up. 

If you want to reorder the playlist click on the bars off to the right of the song yo want to move, hold it down and drag it to the position you want. When you have it where you want it click "Done".


When you are done your playlist will be in the order you want and you are ready to enjoy your music in the order you want it!


4/8/13

Carrying the Mail

Sometimes when I help a friend or relative with a Mac issue or problem I wonder if what I'm doing is worthy of posting on my blog. When I got two requests within a week on how to move mail from one Mac to another I knew I needed to write it up. 


As most people know there are different flavors of mail and mail servers; POP, IMAP, SMTP etc. If you have been around a while and have an ISP that uses it's own mail server, you probably have a Post Office Protocol or POP account. POP was designed for, and works best when you use only a single desktop computer. Normally, messages are downloaded to your desktop computer and then deleted from the mail server. The difficulty with POP is that all your downloaded mail resides on your computer so when you get a new machine you won't be able to access your old mail unless you move it. So how do you move mail from one machine to another?

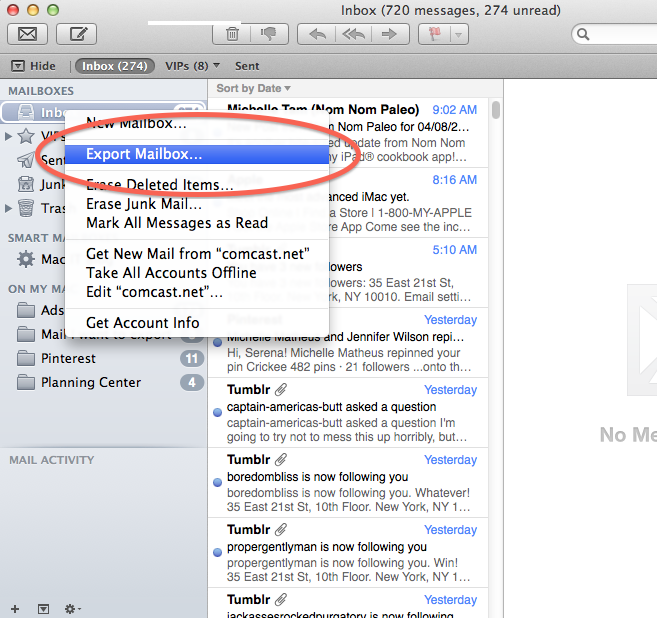
Open the Mail application on your source machine. In the left column select the inbox and right (or control+click). From the drop down menu select "Export Mailbox..."


Save the file to your desktop. If you have created your own mailboxes on your Mac you will also need to export each one in the same way.


Now you will need to transfer these Mailbox files to your new Mac. From your new Mac mount up the Hard Drive of your old machine and drag the file over to the new one.

Once you have the file on your new Mac you will need to start the mail application on that Mac and do an import. In the "File" menu just select "Import Mailbox" for each of the mailboxes you exported.


Once you have imported all your mail you are almost done. Now you need to make sure that your attachments are accessible. 

Apple's default storage location for mail downloads is:

      Users/Username/Library/Mail Downloads

Since Apple doesn't normally allow you access to your library folder from the finder you will need to use the  Finder "Go" menu. I bet you've never used it have you?

Open a Finder window and at the top of the screen in the "Go" menu select "Go to Folder"


Now type "~/Library/ in the "Go to folder:" window.


Once the window opens navigate to the "Mail Downloads" folder and drag the contents from your old Mac to the same location on the new Mac. It might be easier to drag the whole Mail Downloads folder to the desktop of the new Mac then drag the contents of that folder from the desktop location to the New Mac's Mail Downloads folder. 

You don't want to overwrite any files or folders on your New Mac. All you want to do is add the contents of your old Mail Downloads folder to the Mail Downloads folder of the new Mac. Make sense?

That's it!  You're done. Just as a quick FYI - You would usually want to use the Migration assistant to move your data from your old Mac to your new one. It's easy and it's what Apple recommends. But it's not always the best solution. 


Sometimes  it's better to do a spring cleaning and not transfer all your data and preferences. That way you can start with a clean slate and remove the chance that outdated files and old data corrupt your new machine. By choosing to move your data and files manually you get to decide what you want to keep and what you want to get rid of rather than loading down your new machine with outdated junk. 


3/20/13

Workflow Processing Multiple Files - TiVo Edition


It seems that there are a lot of people that have been struggling with their TiVo. Like me they want to watch shows when the want, where they want and on the device they want. The problem is getting the recorded show off the TiVo, decrypted, edited then transcoded into a file type that their personal device can play. 

I originally wrote about an application called iTiVo that made this process a lot easier.

TiVo & the Mac - Downloading TiVo files

Then an OS update broke iTiVo so I wrote up a work around. You can read about it here:

TiVo to Mac - Mountain Lion Edition

After a few months, when iTiVo finally became usable again, I wrote up a quick way to update the beta version to get full functionality back. 

Continuing Adventures with iTiVo

I don't know when iTiVo will be updated to work without major surgery but hopefully it will be soon. So while we wait I want to answer a question that has been asked a lot during this whole process; How do I create a Apple Workflow that will process multiple files? This question doesn't just apply to processing TiVo files of course but I'll use that as my example.

Apple provides a great tool for speeding up and automating your work tasks. It's called Automator. It's an easy tool to get to know but getting it to do just what you want, in the way you want can be a trial. 

Let's assume for a minute that iTiVo is broken again and you want to watch the entire season of Supernatural that currently sits on your TiVo. Downloading the files is easy. You can use the web version I wrote up here, or if you have Roxio's Toast you can use the included "TiVo Transfer" application to download your files. Either way you end up with a file on your Mac that is encrypted. So let's decrypt them. 

Assuming you have followed all my directions you should have a copy of tivodecode loaded on your Mac. Now all you need is an Automator Workflow to convert all the files. Not one at a time, but in a batch so you can set it running before you go to bed. 

Open up the Automator application and create a new Workflow


In the column at the left you will need to select "Files & Folders" icon on the left then drag the "Ask for Finder Items" into the window pane on the right.  In the "Prompt" section just type in "Choose a Tivo file(s)" and fill the folder location you normally use when you download your Tivo files.  To handle multiple files make sure that the Type is set to "Files" and "Allow Multiple Selection" box is checked. 


In order to deal with multiple files we need to assign them as variables. Select "Utilities" from the Library and drag "Set Value of Variable" to the right window pane. In the Variable box create a new variable. I called mine "Tivo_File". 


Just as an explanation, the variable "Tivo_File" will be set to the file or files you select manually when you run the action. The value of the variable will be the full name of the file including path.

example:

.../TiVo Files/Supernatural_Hunteri_Heroici_111 KSTWDT_1363233538.TiVo

This is a very important point that we will have to deal with later in the shell script. The tivodecode application needs both the path to the file and the file name.  Now that the variable is set we need to use it.

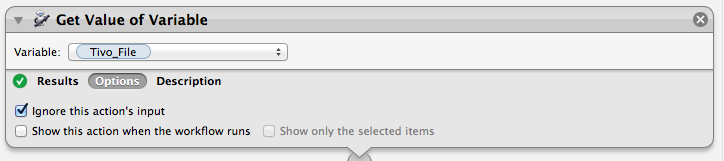
Again select "Utilities" from the Library and drag "Get Value of Variable" to your script. It seems odd, and you would think the computer should remember the variable because you just set it, but that's the way scripting works. Especially when dealing with multiple files. Make sure that the Variable is set to "Tivo_File" or whatever name you choose in the set variable value step.


Another important point is to make sure the "Ignore this action's input" check-box is checked in the options tab since our input is the variable itself. 

Now that we have our variable we need to run a shell script to decode it. Grab the "Run Shell Script" action from utilities and move it to the Window pane on the right.  Make sure the "Shell" is set to "/bin/bash". 

The first thing we do is start a loop to process each of the files you selected. I have titled my loop counter as the letter "i".  

      for i in "$@"
       do

After we start our loop we need to decode our variable and just grab the file name without the full path information in front of it. To do that I choose to use the UNIX awk command. There are a lot of ways to do this but this one works. The assumption here is that your file name extension has .TiVo at the end. Or to be more exact, it has a dot "." and an extension at the end of the file name.  I've set the file name to a script variable called "fname". 

fname=`echo $i | awk -F"/" '{print $NF}'| awk -F"." '{print $1}'`

After we have the file name we need to run tivodecode. 

tivodecode -m 1234567890 -o "/MacHD/Users/Username/Movies/$fname.mpg" "$i"

Remember to insert your real MAK address into the command where I have put "1234567890". Also insert the real path to your output file. The output file will be the same as your downloaded TiVo file name but with an ".mpg" extension.  The "$i" at the end of of the statement is the full path & filename. Make sure to inlude the quotes as I have shown above.

Since that's all the processing we need to close the loop by adding "done" at the end of the script.   This is how your script should look.


Since that's the last step here's a copy of the entire automator action


You can check your script at this point by hitting the run button at the top. If it all works as planned you are ready to save your Automator Workflow as an executable app. Make sure it's saved as an application in the "File Format" drop down menu.

Happy converting and I hope this answers the question of how to process multiple input files in a single script. 


3/4/13

What do Geeks do on their day off?

This past weekend Seattle hosted the Emerald City Comicon. According to their web site it's "the largest comic book and pop culture convention in the pacific northwest!" After attending this geekfest I tend to agree. It was jammed with artwork, comics, TV stars, & people dressed as their favorite characters. It was a a great break from the more technical side of my brain and my family and I had a blast. 


I thought you might enjoy some photos just to help get you through your Monday. Enjoy! If you see a friend, someone you know or yourself leave a comment and I'll send you a copy of the photo.  


These escalators are empty at this point. Usually they were packed. 


Notice the eyes? Where do you get yellow contacts? Oh, right they sell them in one of the booths. 


Makes my neck hurt just looking at her


You wonder how much makeup you go through to get yourself this pink all over?


Just how many cows died to make this!?


Couples often coordinated their costumes


Artists were working during the show


A Seattle icon with a twist


The depth and breadth of the artistic skill was impressive


This artist actually worked for WB and was one of the animators for Pinky and the Brain as well as Animaniacs. 


Great booths with lots to see


Say it with me, "Drinking blood is bad"


Who knew under all that armor Boba Fett had tats and needed more.


Here's a Brave little girl.


It's all about comics. 


My legs hurt just looking at these costumes. Let alone walking around in them for 3 days.


The floor space was HUGE. 


"No ghosts here... I think..."


Girl power


Everyone took pictures. 


Nice toys were also available


Misha Collins - The reason my wife and daughter wanted to go to the con.


Red Sonja


Queen of Hearts


Riddle me this 


Steam Punk and some nice gaming furniture


Comic/CosPlay fans come in all ages


Spidey sense isn't always enough and sometimes you just have to text


I found this guy outside the men's room. Looks like even Waldo needs to go sometimes.


Venom


The requisite Storm Trooper


Here's a motley crew


Even heros have to rest for a while.


What a family. 


There are so many characters and I soon realized that those that grew up on DC comics or Marvel are in the minority. With the web, TV and all the independent comic companies it's hard to know what series this is from. 


Ready for action!


Had a fun time talking to this very nice person. She wasn't sure anyone would want to take her picture. But I think the costume is great.


A princess for sure


I'm not quite sure what this is but all I can say is Wow!


A Cylon from my youth


Avitar


The Joker


Zombie Rogers - So wrong, yet so right


Antonia Stark


Jack Frost


Baby-Fett