
Here are a few questions I've been asked before and how you can change the settings to solve them.
The sound quality isn't very good. How do I fix it?
Many movies and TV shows are nonstop action and massive explosions so having the best quality sound isn't always required. Some movies star Keanu Reeves and you may not want to hear any dialog. But some movies have a great soundtrack or maybe the dialog is just muddy and you want to improve it. To get the best sound go to the "Audio" tab in Handbrake and bump up the quality.
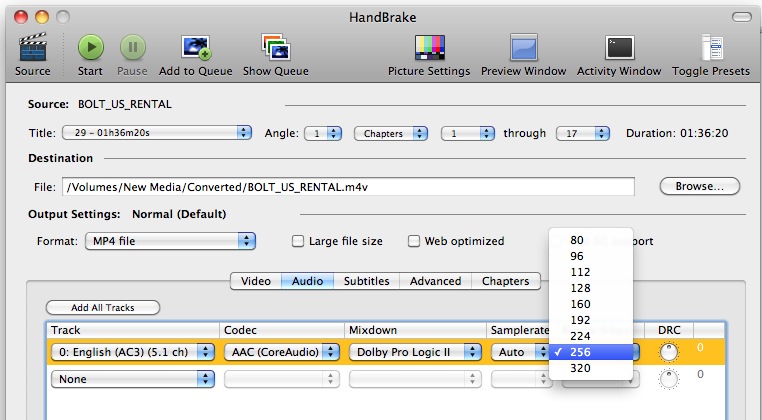
I use 224kbps or 256kbps when I want better quality. It will make the file larger but if you want some punch out of the soundtrack or crystal clear dialog, it's the way to go.
There are 99 Titles which one do I pick?
Even though ripping your DVDs is legal doesn't mean Hollywood wants to make it easy to do. Disney DVDs are usually the culprit here but many Hollywood studios try to use subterfuge to prevent you from making copies of your own Movies. This is kind of strange to me because Disney of all people should understand the need to keep fragile DVD disks away from little kids. How many times have you tried to read a scratched or cracked DVD and it doesn't work? That's one of the big reasons you should back up your disk or make a digital copy, so your kids don't ruin it.
If you open Handbrake and select the DVD as the source and see something like this,

don't panic. You can easily figure out which of those 99 titles is the right one to rip.
Open DVD player and after all the introduction, coming attractions, and ads for stuffed animals are over start playing the movie. Once it's started to play, pause it and go to the "Go" menu and look at the "Title." Whichever title is selected is the one you pick in Handbrake. In the case below, it's title number 29.

When I play my movie everything looks squished. How do I fix it?
First let's talk about aspect ratio. That's the ratio of the width to height of a movie. Today's movies usually have an aspect ratio of 16:9. If you watch old TV shows they have an aspect ratio of 4:3. Why do you care about this? Well, the aspect ratio of the original movie might be different than the screen you are watching it on. That can make your ripped movies or TV shows look squished if you don't take it into account when you rip a DVD. DVDs are encoded differently when you buy the widescreen version. This is how Wikipedia describes it:
"A DVD labeled as "Widescreen Anamorphic" contains video that has the same frame size in pixels as traditional fullscreen video, but uses wider pixels. The shape of the pixels is called pixel aspect ratio and is encoded in the video stream for a DVD disc player to correctly identify the proportions of the video. If an anamorphic DVD video is played on standard 4:3 television without adjustment, the image may look horizontally squeezed."
What you need to do is set your video to encode using anamorphic processing. Quoting the Handbrake manual: "... 'anamorphic' means the movie doesn't have a single, native shape that you watch. Instead, it shape-shifts. If you're watching it on a standard TV, it morphs to fit it. When you play it on a widescreen TV, it morphs to fit it, too."
Here's how you set things up to encode using anamorphic settings. First load your DVD, make all your usual settings then go to "Picture Settings" and "Size."

You just need to make sure is that Anamorphic is set to either "Loose" or "Strict." Strict is more precise but Loose is more flexible. Just stick with "Loose" and you will get a movie that always looks good no matter what screen you watch it on.
How do I get rid of those lines on the screen?
Those lines are there because of something called Interlacing. It's a common way to compress video. Each frame of an interlaced video signal shows every other horizontal line of the image. As the frames are projected on the screen, the video signal alternates between showing even and odd lines. When this is done fast enough, i.e. around 60 frames per second, the video image looks smooth to the human eye.
Those lines usually show up when you rip an older DVDs or in animation. Before you hit the start button it's always a good idea to open the "Picture Settings" icon in Handbrake and use the "Preview" button to view the movie and see if the movie has bad interlacing. Here's an example from one of my kids favorites, Rescue Rangers.

Notice the double image and interlacing? It's annoying in the extreme. To get rid of it just open "Picture Settings" and click the "Filters" button.

It's counter intuitive but don't pick "Deinterlace". Use the slider and pick "Decomb" and "Default". When you process your file it should solve your problem. Decomb uses a method to search for interlacing problems and only fix those frames that need it. If you use Deinterlace then it will deinterlace every frame making for a lower quality picture. You can read more about it here.
How do I rip TV shows on DVD?
Movies aren't the only thing people like to watch. DVD sets of your favorite TV shows are a hot seller and even old shows are getting a new life on DVD. To rip your TV shows from DVD here's what you need to know.
Today's "hour" long TV shows are usually about 41 minutes long. The "half" hour shows are about 21 to 23 minutes long. As you might guess if you've been a TV watcher for a while, the newer the show the shorter the length. An episode of "I Love Lucy" might be 25 or 28 minutes long but "The Big Bang Theory" is only about 21 minutes long or as short as 19. what you need to look for is a consistent set of titles that are about the same length. Just insert the first DVD of your TV show and look for a bunch of titles that are about the same length.

In the case above titles 3-10 are all about the same length and based on the description on the case match perfectly with the number of episodes on the DVD. Just select the first one and make all your settings then click the "Add to Queue" button. Then select the second, make sure the settings are all OK and add it as well. Go through and add all the episodes until you have them all in the queue. IMPORTANT - Just make sure you type in a unique name for each title so they don't overwrite each other. Once you are finished adding them to the queue just click the "Start" button and they should all process like normal.
Here's a second hint on TV shows, if you are picky you can always use the same trick I wrote about above in the "99 titles" question. Open up the DVD in the Apple DVD player, start the specific episode and check which title is playing. That way you will know which episode is which. It will take more time to do but is a sure fire way to get it right.
Excellent tips! If you'd like I can help you co-write a post on ripping a file with sub-titles either as a burned-in image on the video or as a separate sub file useful in dual-audio files.
ReplyDelete