7/10/12

Connecting Remotely Using BTMM - From Someone Else's Machine

There are a lot of Mac applications available that will let you connect to your Mac when you are away from home. All of the easiest to use applications have some sort of registration so you can find your Mac out of the millions that are using the Internet at any given time. Apple has one of the best remote access applications built into their OS. It's part of Apple's free iCloud service and called "Back-to-my-Mac", or just BTMM for short. 

When you register each of your Macs with iCloud, and enable BTMM, the software allows you to access any of your Macs disks or share the screen remotely from where ever you are. If you are sitting on the Lanai of your beach condo in Hawaii and need a file from your home computer just connect to Mac and mount up your hard drive. Copy the file and you are done. Even better, if you want to operate your Mac remotely just click the "Share Screen" button and log in.

The one drawback to all this remote convince is trying to connect from a Mac that isn't yours or is associated with a different iCloud user back to your machine.  The good news is that with a little preparation and the right software you can do it! To get things working you need to gather some specific information and set up your Mac. 

The one key piece of information you need to know is your Mac's Internet address. This is a unique number that identifies you to the internet. Most Internet Service Providers (ISP) assign you a dynamic IP. That means that you will never know what it is on any given day unless you write it down. There are free DNS services that will associate a name to your IP address but thankfully, for Apple iCloud users, Apple does this for you! To find out your DNS name all you need to do is open up the Terminal application located in your Utilities folder and run a simple command.


First off, don't be afraid of the command line. You just need to run one simple command, write down the information, then quit terminal. The command you need to run is the multicast DNS service discovery. It will figure out the DNS name associated with your iCould account.

$ mDNS -E
Looking for recommended registration domains:
Talking to DNS SD Daemon at Mach port 5891
14:42:11.478  Recommended Registration Domain local. Added
14:42:11.479  Recommended Registration Domain <.Mac ID>.members.mac.com. Added
14:42:11.479  Recommended Registration Domain XXXXXXX.members.btmm.icloud.com. Added

As of MacOS 10.7 Apple is still using the .Mac members DNS name even though it no longer works for this particular VNC use. The DNS name you need to copy is your iCloud DNS name. In the example above it's the last line. The results will have a unique number associated to your iCloud account name.

      12345678.members.btmm.icloud.com.

Now you need to make sure your Mac is set up. Open up the system preferences and select "iCloud" under "Internet & Wireless" and click the "Back to My Mac" check box. 
Because you can have multiple Macs associated with a single iCloud user ID you also need to identify which Mac you want to connect to.  For each Mac associated with your iCloud user ID open "System Preferences" and click the "Sharing" tab. Write down the "Computer Name:" that appears at the top. In the case below it's just "iMac".
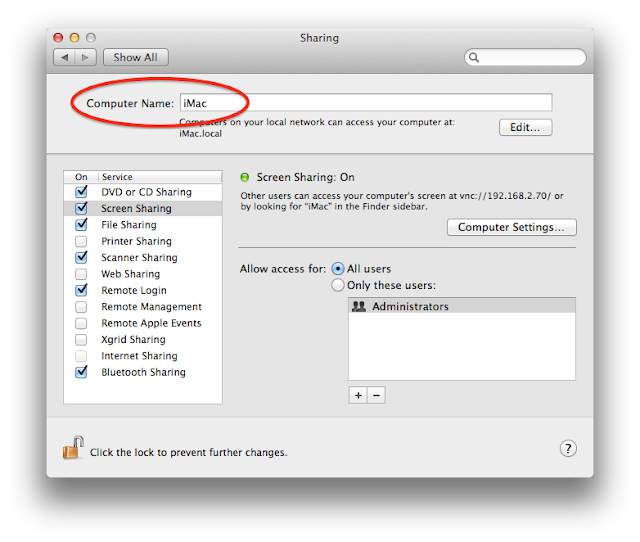
Lastly you will need to enable VNC connections for your Mac. Select "Computer Settings" in the same "Sharing" Preferences panel, check the VNC box and type in a strong password. Because your machine is accessible from outside your firewall I suggest using upper & lower case letters, numbers and characters (!,@, #, etc.)
You are now set up and have all the information you need to connect to your machine using your favorite VNC app. One of my favorites is Chicken of the VNC. You can download it here.


Once the application opens just use the new connection command in the "File" menu. in the host: box type

      <computer_name>.XXXXXXX.members.btmm.icloud.com

An example might be

      iMac.12345678.members.btmm.icloud.com.


When you connect you will see a login box. This is where you type in the VNC password you just set above.

If you don't want this box to appear you can enter your VNC password in the VNC Login screen and select "Remember Password." After your VNC connects you will see your Mac's login screen.


Select your user and log in! If everything works as planned you should be now be logged into your machine.


6/23/12

Dragging Analog into Your Digital World

For all the recent hype about Apple's new hardware and the new features (Solid State Drive, Retina Display, No DVD/CD Drive) the one constant is the need for something good to put on your shiny new Mac. Today I want to concentrate on how to get your data onto your Mac. 

When people think about data they usually think about text documents, old email, music, movies & photos. If you already have digital data moving it from an old computer to your new Mac, even one without a CD/DVD drive, is easy. Just use your WiFi network, drag and drop. But what about digitizing your old analog data?  What about documents that aren't in digital form or old photographs your parents or grandparents gave you? This is where scanners come in. 

Scanners may be something out of the 1990's (has it really been over 20 years?) but they work well and give you a high quality output. I own an Epson Perfection 3170. A great scanner for it's day and one that still works well. A quick trip to your local thrift store and you will see that a lot of people have dumped their scanner thinking they will never need it. But if you want to bridge the analog/digital divide then a scanner can come in handy. 

If you do own a scanner your next question is how to use it. Although most of the major manufactures have their own software most of that software is out of date junk. The rapid updates of Mac OSX often renders all those applications useless. Not to worry. Did you know Apple has a way to scan using Apple's own software that comes with every Mac? Today I want to show you how to use the ubiquitous Preview application with your scanner.


Scanning with Preview

1) Turn on the scanner and open up Preview

2) Under the "File" Menu select "Import from Scanner" and select your scanner

3) You will now see a blank page with less than basic scanner functions available. In order to really take advantage of the power of your scanner you need to select the "Show Details" button at the bottom.

 4) Now the fun starts. Selecting "Overview" will give you a preview scan of your photo. From this you can select the image and crop to the desired size. Once you have set the scan area you can now balance the color.

On the right side of the window are the controls to help color balance and correct the image. There aren't a lot of controls but tweaking the sliders can greatly improve your photo. If you are familiar with iPhoto you shouldn't have any issues figuring things out. If not, just experiment and with the sliders until the photo looks right to you. 

As a last step before scanning make sure to change the resolution to a value that suits how you are going to use your photo. If you just want to email it or post it on Facebook you only need to set it at 100 dpi or so. If you want to take your file to your local drug store to get a reprint or you want to edit it in Phtoshop then scan it at a higher resolution. 


5) Once you are done adjusting the color just select the "Scan" button at the bottom, save the file and you are done. 


There may be better scanning applications out there that give you greater control of your output but convenient and free sure is nice! 

4/6/12

Extra Storage for your iPad


When Apple's first iPad went on sale people rushed out to buy one. When the iPad 2 came out even more people bought one. Then came the iPad 3, or as Apple calls it, the "New iPad." This new iPad is faster and has a better screen but throughout all these upgrades the storage sizes remained the same: 16GB, 32GB & 64GB. 

The best new feature on the new iPad is the retina screen. It's amazing! But one of the things people don't think about is the impact that georgous retina display has on storage space. To take advantage of the hi-res display application developers have added new retina display compatible graphics in their Apps. The result is an increase in App size. 

Since all versions of the iPad, both old and new, use the same application everyone who owns an iPad, regardless of model, is impacted. When you start to add up all the extra storage space those apps are adding the increase is alarming. After a while that midrange 32GB iPad is looking a bit cramped and the 16GB model is getting downright tiny. You may be able to host your music in iCloud but hosting video files is a bit trickier. And sometimes you don't have WiFi or cell connection. 

If you like movies & TV shows, have a lot of old USB drives or SD cards laying around and want to save some space on your iPad, here's how you can use external storage to store your video files. 

First some caveats:
  • Your videos must be H.264-compliant
  • You need to own one of Apple's camera connection kit adaptors
  • You need to rename your video files to mimic the filenames from a camera SD card
  • You must have enough free space you your iPad to copy the file
  • You won't use the "Videos" app on the iPad to watch your files you will use "Photos"

Getting your video ready

I did a write up about using Handbrake to get your videos off of DVD and into the proper format here & here.  Just make sure it's H.264-compliant. Once you have your video file you now need to get it on the iPad. Go do a search around your house and in your desk. If you're like me you will find a ton of old 1GB, 2Gb or even 4GB USB drives and SD cards. Grab one and set it up.

Setting up the SD Card or USB drive


The name of the SD/USB device can be anything you want but the folder structure must match the structure found on camera SD cards. On the device create a folder called "DCIM" and a subfolder called "100DICAM" or , if you are a Nikon fan, "100NCD90"  


Add the Video Files

Copy the video file you want into the DCIM subfolder you just created and rename the file. You MUST use eight characters with sequential numbers exactly the same way your camera does it. Use something like DSC_1000, DSC_1001, and so forth. If you do load up several different movies just make sure to keep track of your video names and what you called them. A 32GB flash drive holds a lot of old Animaniacs episodes and heaven forbid if you should pick the wrong one to watch on a long plane flight. 

Now make sure you have enough free space on your iPad to store the file then plug in the camera connection kit adaptor with your SD card or USB drive plugged in. 

Importing your Videos to the iPad

After you plug in the connector you will be prompted to import you file(s). 


Once the import is done you can unplug your connector. Now just tap the video and start watching. Remember that your videos are only accessible in the "Photos" app not the normal "Videos" App.


Deleting iPad video files

After doing this walk through several times one thing that isn't intuitively obvious is how to delete these video files you added so I figure I'd review it for you. 

Open up Photos and select "Albums" or "Events"


Select the video you loaded and on the next screen tap the button in the upper right corner.


Select your video 


And delete it


On a long trip you can now take along videos for everyone without worrying about who get's to choose what goes on the iPad. You also free up space for Apps music and other photos. 

Enjoy!


3/18/12

iPad OverDrive Tutorial

Libraries have changed in the digital age. Many new libraries are being designed with less shelf space for hard bound books and adding more space for computers & desks. Fewer books on the shelves may mean you won't be able to find a copy of your favorite thriller when you want to read it but the change to the digital world also has its advantages. One of the biggest for the voracious reader out there is digital books.


Holding a real cloth and paper book may be comforting for the old school among us but more and more publishers are discovering that they sell more digital copies than paper copies. Companies like Adobe, Amazon and Barnes & Noble recognized and spurred the change with  their own digital book formats. iPad, Kindle and Nook compatible books are now the mainstay of many libraries. To distribute those digital books, libraries rely on a company called OverDrive. OverDrive set up an infrastructure that lets library patrons check out electronic books, audio books and videos. Because using OverDrive isn't intuitively obvious I've written instructions to help guide you through the use of OverDrive to check out and read library books on your iPad. 


Set Up OverDrive


Make Sure Overdrive is loaded on your iPad. If it’s not you can download it at the in the App Store in iTunes. If you don’t have OverDrive installed you can download it here:


      Overdrive 


Another account you will need to have is an Adobe ID. This is required to read the EPUB version of e-books. To get an account go the adobe website and create your Adobe ID. 


You can use a unique, but not necessarily functional email address for this step. They will not email you to confirm your account. 


To install your Adobe ID open OverDrive and select the “Get Books+” icon in the upper right of the screen.


At the bottom of the next screen click the settings button.


Now you just need to click the Adobe Authorization button and input your newly created Adobe ID.


Once these steps are done you can now start downloading books.


Downloading your Books


Open the App by touching it and you will see a screen showing all your current books and a “Welcome to OverDrive” book included with the program. 


Now click on the “Get Books+” icon in the upper right corner of the screen and you will be asked to “Add a Library”. Click the plus sign to add your local library.


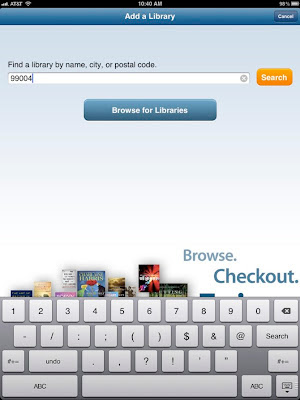
Type in your local Zip code ... 


And find your library...


After you select your library it will be added to the OverDrive list and you wont need to add it again. Selecting your library from the OverDrive list will now open the Safari browser with the OverDrive web page for that library. 


Select “Login” and enter your library card number and PIN number.  You may need to visit your local library to get this set up if you don’t already have a card and PIN number. 


Now comes the fun part, finding books to read!  Just click on the search tool (the magnifying glass in the tool bar) and enter your favorite author, title or subject. Once you find what you are look for you need to add it to your cart. For the iPad you need to make sure to select Adobe EPUB ebook.


After you add the book to your cart you can continue to browse the library or you can check out. Once you select the check out option a screen will be displayed showing you the books you are checking out, the format of the book (Adobe EPUB) and a choice for check out period. 


Unlike old school paper books libraries tend to limit the checkout time for e-books. They also limit the number of books you can have checked out at one time. If you are a fast reader make sure to choose the shorter checkout period because unlike paper books there isn’t a way to return e-books before they are  due. If you are at your book limit you may have to wait until the digital check-in period is over to check out a new book.


Once you have confirmed your check out you can download the book. Just click the download button for each book in your cart. 


Once the download finishes you can close Safari, go back to the Overdrive app and your books should be available to read!


Reading your Books


When using iPad Overdrive to download your library books you must use the Overdrive application to read your books.  This is a result of the digital rights management the publishing industry has instituted for all digital material. Each book has a digital signature with the library it came from and your library ID. When you check it out and download it the book is encrypted so only you can read it and only for the check out time period. It’s not convent but it works. Just tap on the book jacket to read it.


Settings


OverDrive does have some built in features to make reading easier. Like iBooks you can change the font size, screen background color & brightness  as well as set reading to night mode. Just tap once in the middle of the screen and the menu selections will appear. At the upper left corner of this screen is an arrow to get back to the main OverDrive screen showing your book library. 


Now sit down with a good cup of tea and enjoy your books!!

3/5/12

Rumors & Whispers of New Products

The Mac world and all things Apple, have always had rumor sites. You know the ones; Some China based manufacturer leaks the specs to the latest Apple gadget and the blog world goes nuts speculating about how much they believe it (or not). When the first iPhone came out the Internet was awash with speculation on the new iPod turned phone. Before the first iPad came out rumors swirled for months about how big it was going to be, the screen resolution, if it would have a built in camera, what was the processor, no detail was too small for speculation.  Many sites got it right but just as many were way off base. Well today I'm about to join the ranks of the rumor sites.


First let me make something very clear, I have no inside source. I live a stones throw from many of the Microsoft campuses. If you want MS rumors I may be able to dig something up, but Apple rumors, not so much. I'm not connected with any clandestine Apple mole that feeds me information. I'm just going to speculate on current rumors and what they could mean based on creative thinking and a gadget freaks day dreams.

The iPad 3 is coming out very soon and the current buzz seems to have identified some features based on solid fact. I do believe that it will be about the same size and shape as the iPad 2. I think it will have a better camera and a 4 core CPU. I think it will be 4G LTE and will be priced about the same as the current iPad 2. The iPad 3 rumors are cool and interesting but everyone is talking about the iPad 3. What I want to talk about are the rumors that are starting up about the iPad-mini or 7 inch iPad.

When the first iPad came out people from the media asked Steve Jobs if Apple was ever going to make a smaller version of the iPad. Something that could compete with the Kindle, Galaxy or other small tablets that were in the market. He famously responded with, and I paraphrase here, "Hell No!" Yet the rumors persisted.

There is a current rumor that Samsung of all people, has leaked that they are going to supply Apple with 7+ inch displays for new smaller iPad device to be released in the 4th quarter of 2012. Everyone is convinced that the world needs  a new smaller iPad to compete in the world market and it's going to be the next big (little?) thing from Apple. As for me I don't think so. Or rather, I think everyone has it wrong. I don't think it will be an iPad at all.

Heres my big prediction. I think Steve Jobs lied by omission. He was totally truthful that there would never be a 7 inch iPad but he was never asked if Apple was planning on making a remote for the rumored Apple TV.


You see, there are also a lot of rumors going around about a new Apple TV product that is a real TV with the Apple infrastructure for media distribution built in. Some say it will be a 50-inch set costing about twice as much as most TVs of the same size. Others think it will come in various sizes. But whatever its form, many people, myself included, are convinced that this is a real device. Sometime this year I think we will see an Apple product that will truly revolutionize the living room and home media in general. If you want to read about it you can do so here, here or here.

If you take as fact that Apple really is going to build this device then you have to ask yourself how are you going to control it? Then a light bulb appeared over my head ( no CFL for me, it was a good old fashioned incandescent). What if that rumor of a 7 inch iPad was in fact a controller for this new Apple TV set?

I was excited. I thought about it a while and figured that Apple would want to wow the market and make something spectacular that worked well if they were going to get people to invest some serious money on a TV set. A well designed TV with an integrated AppleTV interface would be great. But you would also need some way to control it. Something quintessentially Apple. Something easy to use and inspirational. Sure you could use an iPod, iPhone, or iPad but contrary to Apple's goals, not everyone has one. Maybe, just maybe, they plan on including a smaller iPad like device that can take user input, give feedback and act as a mobile interface to your TV.

If you built such a remote it would have to have features a standard iPad/iPhone/iPad doesn't have. Maybe it would have a  high quality microphone built into it. You can use it for inputs to Siri without getting Siri distracted by the sound coming from the TV itself. That same mic could also act as a way to balance your speakers for you so you have the perfect audio environment for listening to that movie Apple just sold you.

Maybe it could have a built in IR blaster with the ability to control all your current devices attached to your TV. Wouldn't it be nice to have a universal remote for your Amp, Stereo, Blu-Ray player, & CD player? It could be a better version the Harmony remote.

With a large 7+" screen you could have IMDB like information at your fingertips. Maybe Apples social medial failure Ping would finally be useful.  Wow!

With all of those features I would buy one! And that's the point. A TV is great, but with something like a large remote, that can control ALL your devices, give you internet access, provide you with voice commands and come with the TV,  I think Apple would have a real winner on their hands. Maybe they could update the current AppleTV product to use it as well but I'm thinking it will probably be exclusive to the new Apple TV set.

So there you go, write it in your notebook and date it. I don't know if I'm the first to predict this, but I sure haven't seen anyone else speculate that Apple is making a 7 inch Apple TV remote for their new TV. In 6 months to a year I'll probably end up with egg on my face. But who knows, maybe I'm right. What do you think?

PS - Since I used some logos from other sites I figure I should at least link to them.

Cult of Mac
MacRumors
9to5Mac
MacOSRumors

2/25/12

Weekend Update

When it comes to computers and software, you have to remember is that there is always change.  New hardware comes out on a regular basis. For Apple, some the new Mac hardware comes out in the spring. But not always. As for software, it depends on the vendor. Some software get updated almost weekly. But most major (non bug related) software updates occur every 6 to 12 months. 


Sometimes updating software can be annoying, like when your favorite software feature is discontented. Other times its a good thing, like when your old forgotten program is now improved and updated. Well last week a new version of VLC came out that included a lot of new features.


The new version is an awesome update that I highly recommend you get. However, the challenge comes when you try to use Handbrake to rip a DVD. The software update to VLC 2.0 breaks the ability to run Handbrake.


I explained how to rip a DVD in this post. If you re-read the post you will see that VLC is a required part of the equation when using Handbrake to rip a DVD. Because of the legal issues with DRM removal, Handbrake itself doesn't contain the required libraries. It uses VLC for that task.The issue is a that VLC version 2.0 is missing the required library. 


To fix the problem you need to download and install the missing library from VLC.  You have 2 choices, download just the libdvdcss.2.dylib file and move it to /usr/lib on your own or you can download an installer package which installs it for you. Either way, once the file is installed, Handbrake will work once again. 


As a general rule most software updates don't usually break things. But if they do, use your favorite search engine and see if someone else has the same problem and has found a fix. I know it's goes agains all the laws of geekdom but as a last resort you can actually read the manual this often included with the software. Sometimes you might find your answer there as well.


2/14/12

Downloading YouTube Files

The internet has a lot of fun sites out there and one way to waste a lot of time is to poke around on YouTube. You can spend hours following funny and interesting bunny trails of different videos. Sometimes though, you wish you could download it and take it with you. Well consider your wish granted.


There are manual ways to download YouTube files, but if you want to do things the easy way download an application called GetTube and let it do the heavy lifting. You can use this link for the direct download.

Once you have downloaded the application you just need to set up the download location in the preferences window.


Then open up the GetTube application window and find the YouTube file you want to download. GetTube has an in-app browser so no need to switch to Safari.


You will notice a very small download button in the lower right corner. Just click the button and a dialog box will pop up asking you the format you want to save the file as.


Do you want the video or just the audio?  Pick one and hit download. After a while your download will be done!


Just go to the download location you specified to find your file and you're done. Couldn't be easier.